How to use Native Code in Unity

You can use native code in Unity by importing Native Plugins.
Native Plugins are basically libraries of native code written in C/C++. You can import them in C# and make function calls to native code. This way you can gain performance, or use them for whatever reasons you have. I want to note that this isn’t Unity specific thing, I am just using Unity as an example.

How To Create a Native Library

I am working with Visual Studio, so I will show you how to do it in Visual Studio.

You need to create a C++ Dynamic-Link Library (DLL) project. After you write your native code there, you need to build the project and a .dll will be generated. Later you will need to import this .dll in Unity.

Let’s write a simple function so that I can show you how to import it in Unity.

#define DllExport __declspec(dllexport)

extern "C" {
	DllExport float GetFloat() { return 1.0f; }
}

How To Import It In Unity

First you have to place the .dll somewhere in the Assets folder. You can create a sub-folder specifically fot the native libraries if you want, it doesn’t matter. Let’s say the name of the library is MyLib.dll. This is how you import it.

public class TestBehaviour : MonoBehaviour
{
    [DllImport("MyLib")]
    private static extern float GetFloat();

    private void Awake()
    {
        Debug.Log(GetFloat());
    }
}

How To Import a Class

Lets say you don’t want to import static functions, but an entire class with instance methods instead.

The concept of “instance” method is actually just some sugar that the compiler/framework provides. Actually all methods are static. Instance methods just have an additional hidden parameter “this” that is a reference to the object instance.
If you want to call a native method for a certain native object, you would need to pass the native object reference along to the method call. Usually, you would create a wrapper class in .NET/C# that holds that native pointer (IntPtr) and provides the required methods for the C# environment. Those calls are then forwarded to the native interface. You just have to pass the object along.

Here is an example

// Header
class Person
{
public:
	Person(const char* name);
	~Person();

	const char* GetName() const;

private:
	char* _name;
};

// Source
Person::Person(const char* name)
{
	size_t nameLength = strlen(name);
	_name = new char[nameLength + 1];

	for (int i = 0; i < nameLength; i++)
	{
		_name[i] = name[i];
	}

	_name[nameLength] = '\0';
}

Person::~Person()
{
	delete _name;
	_name = nullptr;
}

const char* Person::GetName() const
{
	return _name;
}

// Export Interface
extern "C" {
	DllExport Person* CreatePerson(const char* name)
	{
		return new Person(name);
	}

	DllExport void DestroyPerson(Person* person)
	{
		delete person;
	}

	DllExport const char* GetPersonName(Person* person)
	{
		return person->GetName();
	}
}

// C# Wrapper Class
public class Person
{
    private IntPtr _personPtr = IntPtr.Zero;

    public Person(string name)
    {
        IntPtr namePtr = Marshal.StringToHGlobalAnsi(name);
        _personPtr = CreatePerson(namePtr);
        Marshal.FreeHGlobal(namePtr);
    }

    ~Person()
    {
        if (_personPtr != IntPtr.Zero)
        {
            DestroyPerson(_personPtr);
            _personPtr = IntPtr.Zero;
        }
    }

    public string GetName()
    {
        IntPtr namePtr = GetPersonName(_personPtr);
        string name = Marshal.PtrToStringAnsi(namePtr);

        return name;
    }

    [DllImport("MyLib")]
    private static extern IntPtr CreatePerson(IntPtr name);

    [DllImport("MyLib")]
    private static extern void DestroyPerson(IntPtr person);

    [DllImport("MyLib")]
    private static extern IntPtr GetPersonName(IntPtr person);
}

AI Perception in Unreal Engine 4 – How to Setup

For those of you who are wondering what AI Perception is – this is a really nice system in UE4 that provides an easy way for the enemy AI in your game to track hostile/friendly/neutral characters. For example if the enemy AI sees the main character, he will attack it an so on. The AI can become aware of characters through vision, or if they hear them. There are many predefined senses.

The reason for this post is that setting up the AI Perception is very easy, but there is not much documentation yet and it was very hard for me to find a proper way to set it right.

The Setup

There are two components that we need: AIPerceptionComponent and AIPerceptionStimuliSourceComponent. The AIPerceptionComponent is the component that listens for perception stimulants (sight, hearing, etc.). The AIPerceptionStimuliSourceComponent is a stimuli source for the AIPerceptionComponent. The stimuli source stimulates the perception of the enemy AI, so that it can detect the source (our character for example).

I’ve seen many people add the AIPerceptionComponent to the enemy Character, but that is incorrect. It must be added to it’s AI Controller.

AIPerceptionComponent Setup

We create a default AIController, and the only component we add to it is an AIPerception Component. We are going to configure it only for sight sense like so.

AEnemyAIController

UAIPerceptionComponentSetup

I left everything to the default values. As you can see it’s setup only to detect enemies.

AIPerceptionStimuliSourceComponent Setup

The AIPerceptionStimuliSourceComponent must be added to any actors that we want to be stimuli sources for the AIPerceptionComponent. In our case we add it to our character.

AKnightCharacter

UAIPerceptionStimuliSourceComponent

Is it working?

Lets add an event to the EnemyAIController Blueprint to see if it’s working.

BP_EnemyAIController

PerceptionNotWorking

Well, the “Found” message is not printed so it’s not working. Well I can actually say that it works properly. The message is not being printed on screen because the enemy is not considering us as an enemy. By default all characters are neutral to each other. So how do we tell the enemy AI that the main character is actually an enemy?

Different Teams Setup

We need to place the enemy AI and our character in different teams. By default they are in a team NoTeam which is an enum value that equals to 255. Unfortunately it can’t be done entirely in blueprints. We need to write some code.

In the constructor of the AEnemyAIController we set the team of the AI like so.

AEnemyAIController::AEnemyAIController(const FObjectInitializer& ObjectInitializer)
	: Super(ObjectInitializer)
{
	// Assign to Team 1
	SetGenericTeamId(FGenericTeamId(1));
}

We can’t do the same with the player controller however. Here is the tricky part. A player is controlling a character that is of a certain team, the controller itself doesn’t have a team.

In order to assign our character to a team he needs to implement the IGenericTeamAgentInterface interface. The AIController already implements it. Then we need to override the GetGenericTeamId function. Lets do it.

// KnightCharacter.h
UCLASS()
class THEKNIGHT_API AKnightCharacter : public ACharacter, public IGenericTeamAgentInterface
{
	GENERATED_BODY()

	// ...

private:
	FGenericTeamId TeamId;

	virtual FGenericTeamId GetGenericTeamId() const override;

	// ...
};

// KnightCharacter.cpp
AKnightCharacter::AKnightCharacter(const FObjectInitializer& ObjectInitializer)
	: Super(ObjectInitializer)
{
	// ...
	TeamId = FGenericTeamId(0);
	// ...
}

FGenericTeamId AKnightCharacter::GetGenericTeamId() const
{
	return TeamId;
}

Now if we test it again, the enemy is considering us as an enemy and is seeing us.

PerceptionWorking

The reason our character is “Found” if we exit the field of view of the enemy is that the perceptions is updated when we exit the sight of the enemy too.

How To Create A Fancy Portal Effect In Unity

Expectations

Recently I created a portal particle system in Unity for a game that I am developing. I am really pleased with the result and I want to share with you how to create one yourselves. Here is the final effect that we will be making today.

What do we need

We need four textures

T_Portalbackground
T_PortalCircle
T_PortalDust
T_PortalNoise

With the first 3 we are going to create the particle system itself, which consists of 5 sub-particle systems. With the noise texture (the one with RGB colors) we are going to distort each sub-system to achieve the final result.

We are also going to need 2 custom shaders – Additive and Multiplicative Particle Distortion Shaders. They are very cheap and optimized especially for mobile devices. The game I am working on is a mobile game after all.

Here is the Additive Shader

Shader "Custom/Mobile/Particles/Additive Distortion" {
	Properties{
		_MainTex("Main Texture", 2D) = "white" {}
		_NoiseTex("Noise Texture", 2D) = "white" {}
		_IntensityAndScrolling("Intensity (XY), Scrolling (ZW)", Vector) = (0.1,0.1,0.1,0.1)
	}
	SubShader{
		Tags {
			"IgnoreProjector" = "True"
			"Queue" = "Transparent"
			"RenderType" = "Transparent"
		}
		Pass {
			Blend One One
			ZWrite Off

			CGPROGRAM
			#pragma vertex vert
			#pragma fragment frag

			#include "UnityCG.cginc"

			uniform sampler2D _MainTex;
			uniform sampler2D _NoiseTex;
			uniform float4 _MainTex_ST;
			uniform float4 _NoiseTex_ST;
			uniform float4 _IntensityAndScrolling;

			struct VertexInput {
				float4 vertex : POSITION;
				float2 texcoord0 : TEXCOORD0;
				float2 texcoord1 : TEXCOORD1;
				float4 vertexColor : COLOR;
			};

			struct VertexOutput {
				float4 pos : SV_POSITION;
				float2 uv0 : TEXCOORD0;
				float2 uv1 : TEXCOORD1;
				float4 vertexColor : COLOR;
			};

			VertexOutput vert(VertexInput v) {
				VertexOutput o;
				o.uv0 = TRANSFORM_TEX(v.texcoord0, _MainTex);
				o.uv1 = TRANSFORM_TEX(v.texcoord1, _NoiseTex);
				o.uv1 += _Time.yy * _IntensityAndScrolling.zw;
				o.vertexColor = v.vertexColor;
				o.pos = mul(UNITY_MATRIX_MVP, v.vertex);

				return o;
			}

			float4 frag(VertexOutput i) : COLOR {
				float4 noiseTex = tex2D(_NoiseTex, i.uv1);
				float2 offset = (noiseTex.rg * 2 - 1) * _IntensityAndScrolling.rg;
				float2 uvNoise = i.uv0 + offset;
				float4 mainTex = tex2D(_MainTex, uvNoise);
				float3 emissive = (mainTex.rgb * i.vertexColor.rgb) * (mainTex.a * i.vertexColor.a);

				return fixed4(emissive, 1);
			}
			ENDCG
		}
	}
	FallBack "Mobile/Particles/Additive"
}

And the Multiplicative Shader

Shader "Custom/Mobile/Particles/Multiply Distortion" {
	Properties{
		_MainTex("Main Texture", 2D) = "white" {}
		_NoiseTex("Noise Texture", 2D) = "white" {}
		_IntensityAndScrolling("Intensity (XY), Scrolling (ZW)", Vector) = (0.1,0.1,0.1,0.1)
	}
	SubShader{
		Tags {
			"IgnoreProjector" = "True"
			"Queue" = "Transparent"
			"RenderType" = "Transparent"
		}
		Pass {
			Blend DstColor Zero
			ZWrite Off

			CGPROGRAM
			#pragma vertex vert
			#pragma fragment frag

			#include "UnityCG.cginc"

			uniform sampler2D _MainTex;
			uniform sampler2D _NoiseTex;
			uniform float4 _MainTex_ST;
			uniform float4 _NoiseTex_ST;
			uniform float4 _IntensityAndScrolling;

			struct VertexInput {
				float4 vertex : POSITION;
				float2 texcoord0 : TEXCOORD0;
				float2 texcoord1 : TEXCOORD1;
				float4 vertexColor : COLOR;
			};

			struct VertexOutput {
				float4 pos : SV_POSITION;
				float2 uv0 : TEXCOORD0;
				float2 uv1 : TEXCOORD1;
				float4 vertexColor : COLOR;
			};

			VertexOutput vert(VertexInput v) {
				VertexOutput o;
				o.uv0 = TRANSFORM_TEX(v.texcoord0, _MainTex);
				o.uv1 = TRANSFORM_TEX(v.texcoord1, _NoiseTex);
				o.uv1 += _Time.yy * _IntensityAndScrolling.zw;
				o.vertexColor = v.vertexColor;
				o.pos = mul(UNITY_MATRIX_MVP, v.vertex);

				return o;
			}

			float4 frag(VertexOutput i) : COLOR {
				float4 noiseTex = tex2D(_NoiseTex, i.uv1);
				float2 offset = (noiseTex.rg * 2 - 1) * _IntensityAndScrolling.rg;
				float2 uvNoise = i.uv0 + offset;
				float4 mainTex = tex2D(_MainTex, uvNoise);
				float3 emissive = lerp(float3(1,1,1), mainTex.rgb * i.vertexColor.rgb, mainTex.a * i.vertexColor.a);

				return fixed4(emissive, 1);
			}
			ENDCG
		}
	}
	FallBack "Mobile/Particles/Multiply"
}

As you can see, they are almost exactly the same. The difference is only in the blending and the calculation of the emissive color in the fragment function.

Step By Step

First we are going to make the particle system with the built-in mobile additive and multiplicative shaders, and then we are going to add distortion with our custom shaders. I want to do this, so you can see how big the difference is.

Background

Using an additive shader we start by emitting a single particle with the first texture. The exact color is “FFFFFF4B“. It should look like this.

Nice start huh?

Black Hole

Yeah, you hear right. We are going to create a black hole.
By using a multiplicative shader we are going to emit a single smaller black circle over the white one. The exact color is “000000AF“. Something like this.

Rotating Frame

Next using an additive shader and the second texture we emit 3 circles – each with different start rotation and angular velocity. The exact color is “FFFFFF80“”. It looks like this.

Pulsing Circles

Again using an additive shader and the second texture we start emitting pulsing circles from the center towards the frame. Each circle has different start rotation and no angular velocity. The rate is 3 particles per 2 seconds. Again the color of each circle is “FFFFFF80“.

Small Sucked Particles

Using an additive shader and the third texture we add small particles that are sucked into the portal. Again the color is “FFFFFF80“.

Adding Distortion

The only thing that’s left is adding distortion to each sub-particle system with our custom additive and multiplicative shaders and the noise texture. The only thing we don’t distort are the sucked particles.

Bezier Curves

Bezier Curves are very useful and have many applications, but what do we need to know to implement one ourselves? Well, you can keep reading, or you can just download the unity package that I made.

Lerp (Linear Interpolation)

Before we start we need to know what Lerp is. If you want to understand it more mathematically you can check the description in wikipedia. It’s very simple. Lerp is a function which takes three parameters – a, b and t, where a is start value, b is end value, and t is time (between 0 and 1). The function is defined like this

Lerp

In code it looks like this

float Lerp(float a, float b, float t)
{
    return (1f - t) * a + t * b;
}

Note that we can use the same logic if we want to lerp vectors

Vector3 Lerp(Vector3 a, Vector3 b, float t)
{
    return (1f - t) * a + t * b;
}

Bezier Curves

Now that we know what lerp is we can start.
A bezier curve is also defined by a function, but a function of higher degree (cubic to be precise). For a cubic curve we need 4 points (control points). These 4 points control the shape of the curve. Lets call the points p0, p1, p2 and p3. p0 is called start point, p1start tangent, p2end tangent, and p3end point. Lets imagine that the points are positioned like this:

Control Points

The slider at the bottom represents the t value.
In order to construct the function we are going to go through some steps. In each step we are going to make some lerps, and at the end we will combine these lerps.

Step One

We are going to make 3 lerps – between p0 and p1, between p1 and p2, and between p2 and p3.

Vector3 a = Lerp(p0, p1, t);
Vector3 b = Lerp(p1, p2, t);
Vector3 c = Lerp(p2, p3, t);

It looks like this

Lerp One

Now lets draw lines between a and b, and between b and c

Lerp One Plus Lines

Step Two

Again we are going to make some lerps – this time between a and b, and between b and c

Vector3 d = Lerp(a, b, t);
Vector3 e = Lerp(b, c, t);

Lerp Two

Now lets draw a line between d and e

Lerp Two Plus Lines

Step Three

Now all we need to do is to make one last lerp between d and e, so we can find the point on the curve at any given time t.

Vector3 pointOnCurve = Lerp(d, e, t);

Lets draw the point

Lerp Three

And now let’s draw the bezier curve

Draw Curve

The Function

Now if we combine all these lerps, we get the final function that defines any bezier curve by 4 points and a t value

Vector3 GetPointOnBezierCurve(Vector3 p0, Vector3 p1, Vector3 p2, Vector3 p3, float t)
{
    Vector3 a = Lerp(p0, p1, t);
    Vector3 b = Lerp(p1, p2, t);
    Vector3 c = Lerp(p2, p3, t);
    Vector3 d = Lerp(a, b, t);
    Vector3 e = Lerp(b, c, t);
    Vector3 pointOnCurve = Lerp(d, e, t);

    return pointOnCurve;
}

However this function is not very cheap. With a little math we can simplify the function and thus improve the performance.

Optimizations

Mathematically the function looks like this

Point On Curve

With a little calculations on paper we can simplify it to this

Optimized

So the final function in code can be written like this

Vector3 GetPointOnBezierCurve(Vector3 p0, Vector3 p1, Vector3 p2, Vector3 p3, float t)
{
    float u = 1f - t;
    float t2 = t * t;
    float u2 = u * u;
    float u3 = u2 * u;
    float t3 = t2 * t;

    Vector3 result =
        (u3) * p0 +
        (3f * u2 * t) * p1 +
        (3f * u * t2) * p2 +
        (t3) * p3;

    return result;
}

Bezier Splines (Bezier Paths)

What if we want to create a more complex curve?
There are two options:

  • Use a higher degree function
  • Combine (chain) cubic bezier curves

The first option is not very good, because every time we increase the degree of the function, we create more job for the CPU (we increase the number of calculations).
The second one is more widely used, and it can be explained like this:

Bezier Spline

p3 is the end of the first bezier curve and the start of the second one, and so on.

Observer Pattern

What is the observer pattern used for, and why do we need it? If you’ve heard of the Model-View-Controller architectural pattern, let me tell you that underlying that is the Observer pattern. Observer is so widely used that java put it in its core library (java.util.Observer) and C# baked it right into the language (the event keyword).

In game development we have so many classes that do very different things. It’s good to keep them as decoupled as possible, but sometimes that is very hard. The observer pattern is a great tool to keep your code decoupled very easily.

Achievement System

Let’s say that we want to implement an achievement system. We can have so many different achievements like “Make 20 consecutive headshots”, “Beat the game under 3 hours”, “Fall from high height without dying”. Unlocking these achievements means that we have to make calls to some methods in many different places in our code. Let’s take for example the “Fall from high height without dying”. As you can guess this achievement is somehow tied to the Physics Engine, but do we really want to see a call to AchievementsManager.Unclock(Achievement.FallFromHighHeightWithoutDying) right in the middle of our collision detection or something? How do we avoid that?

That’s what the observer pattern is for. It lets one piece of code announce that something interesting happened without actually caring who receives the notification.

Imagine that our game world consists of entities. The interface for our entities is something like this:

public interface IEntity
{
    void PhysicsUpdate();

    // Other methods
}

The Physics Engine is responsible to update the physics of all entities in the game world. Our character is also an entity, and his PhysicsUpdate() method may look something like this:

public class Character : IEntity
{
    public virtual void PhysicsUpdate()
    {
        // Apply gravity and stuff...

        if (this.FellFromHighHeightWithoutDying())
        {
            AchievementsManager.Unlock(Achievement.FallFromHighHeightWithoutDying);
        }
    }

    // Other code...
}

We want to get rid of the call that unlocks the achievement through our AchievementsManager, because this way we couple the achievements system with our character. We are going to replace it with a call to another method:

NotifyObservers(this, Event.FallFromHighHeightWithoutDying);

This single line of code just says: “Look, I don’t know if anybody cares, but this entity just fell from high height without dying”. If someone cares however, he knows what to do. That someone is actually the observer. There can also be more than one observer, but let’s not get ahead of ourselves. Now we are decoupled from the AchievementsManager, but where did we actually get the NotifyObservers method from? All I can say is that it’s part of the big picture. Now lets draw that picture.

The Observer

Let’s start with the observer class. All observers observe for something interesting to happen. The interface for all observers is as follows.

public interface IObserver
{
    void OnNotify(IEntity entity, Event ev);
}

In our case the observer is the AchievementsManager.

public class AchievementsManager : IObserver
{
    public void OnNotify(IEntity entity, Event ev)
    {
        switch (ev)
        {
            case Event.FallFromHighHeightWithoutDying:
                bool isEntityCharacter = (entity as Character) != null;
                if (isEntityCharacter)
                {
                    this.UnlockAchievement(Achievement.FallFromHighHeightWithoutDying);
                }

                break;

            // Other cases...
        }
    }

    private void UnlockAchievement(Achievement achievement)
    {
        // Unlock if not already unlocked...
    }
}

The Observable Objects

The observable objects are the objects that are being observed by observers. These objects must also notify the observers if anything interesting happened. Let’s implement the interface for all observable objects. We need to be able to add, remove and notify any observers.

public interface IObservable
{
    void AddObserver(IObserver observer);

    void RemoveObserver(IObserver observer);

    void NotifyObservers(IEntity entity, Event ev);
}

In our case the observable object is our Character.

public class Character : IEntity, IObservable
{
    private List<IObserver> observers;

    // IEntity interface implementation
    public virtual void PhysicsUpdate()
    {
        // Apply gravity and stuff...

        if (this.FellFromHighHeightWithoutDying())
        {
            this.NotifyObservers(this, Event.FallFromHighHeightWithoutDying);
        }
    }
    // END IEntity interface implementation

    // IObservable interface implementation
    public virtual void AddObserver(IObserver observer)
    {
        this.observers.Add(observer);
    }

    public virtual void RemoveObserver(IObserver observer)
    {
        this.observers.Remove(observer);
    }

    public virtual void NotifyObservers(IEntity entity, Event ev)
    {
        foreach (var observer in this.observers)
        {
            observer.OnNotify(entity, ev);
        }
    }
    // END IObservable interface implementation
}

Now you see how it works. Our character is being observed by the achievement system. However, he actually doesn’t know that. He only knows that maybe he is being or is not being observed (sounds spooky :D). Either way, he must notify his observers (if any) when something interesting happens. The good thing is that he actually doesn’t know the true faces of his observers. He only has a list of references to instances of some interface. In this list our AchivementsManager is present, because the manager needs to know when the character falls from high height without dying. There is no problem for the AchievementsManager to know about the existence of our character, the problem is when our character knows about the manager. However, that problem is no more thanks to the observer pattern.

Deleting Observers

If you are using C# for a scripting language, or any language with garbage collection you must be wary of memory leaks. What do I mean? Let’s say for example that we have an observer (UI Screen) that observers some stats of our main character. When the player displays this UI screen, it’s added to the list of observers of the character, so when the stats change the UI screen is notified and updated. Let’s say the player closes this screen. The screen is not visible anymore. However the garbage collector will not delete it. You know why? Because we didn’t remove the observer from the list of observers. Our main character has a reference to the UI screen and the GC will not delete it.

If some observer has done it’s job and is not needed anymore, make sure that not a single observable object has a reference to it. Otherwise the observer won’t be garbage collected.

State Pattern

Why do we need this pattern and when to use it? In order to show you we are first going to see some bad code, and then we are going to rewrite the code with the state pattern.

Bad Code

Imagine that we are working on a third person stealth game, and we need to implement the character and make him respond to user input. He can jump and duck.

public class Character
{
    private bool isGrounded;
    private bool isDucking;
    private bool isJumping;

    public void Update()
    {
        // Update the player depending on the private fields
    }

    public void HandleInput(Input input)
    {
        if (input == Input.PRESS_SPACE)
        {
            if (this.isGrounded && !this.isDucking)
            {
                this.isJumping = true;
                this.isGrounded = false;
            }
        }
        else if (input == Input.PRESS_CTRL)
        {
            if (this.isGrounded)
            {
                this.isDucking = true;
            }
        }
        else if (input == Input.RELEASE_CTRL)
        {
            if (this.isDucking)
            {
                this.isDucking = false;
            }
        }
    }
}

At first glance this code is not written badly. When we press “Space” the character can jump only if he is grounded and not ducking. If we press “Ctrl” the character can duck only if he is grounded, not when he is jumping, and so on, and so on. Now imagine that the character can also swim, or even skydive like in Just Cause. Maybe he can also enter different vehicles (cars, jet planes). For all these states of the character we need different booleans – isSwimming, isSkydiving, isInCar, isInJetPlane. In all of these states the character has different input handling. If he is grounded for example and we press “Space” he will jump, but what if he is swimming, or he is in a car and we press “Space” again. Maybe while swimming  the character will ascent, and while he is in a car he will activate the brakes of the car. Now imagine that the character can do many other things. Soon our HandleInput(Input input) and Update() methods will be a nightmare to extent and maintain. In such cases the use of state machines can save our lives.

Finite State Machines

Finite State Machines are very simple. They only sound fancy. We can visualize our current character logic like that

State Machine

  1. The machine has a fixed set of states – Grounded, Ducking and Jumping in our case
  2. Only one state can be active at a time
  3. We can send input to the machine – in our case this is raw input from the user
  4. Each state has a set of transitions – each associated with an input and pointing to another state

Good Code – The State Pattern

Basically, all we need to do is to implement a finite state machine in code. How do we do that? If you are doing it for the first time – it’s hard. It’s actually very easy. Once you see how to do it, you won’t forget it.


Let us first start by implementing an interface for all states. Lets name it ICharacterState

public interface ICharacterState
{
    void OnEnter(Character character);

    void OnExit(Character character);

    void ToState(Character character, ICharacterState targetState);

    void Update(Character character);

    void HandleInput(Character character, Input input);
}

OnEnter and OnExit are very useful, because we can execute some code when the character enters/exits a specific state – play a sound, change the animation of the character, etc. These methods will be called automatically when we make a call to the ToState method. In order to make it automated we need a base abstract class for all of the states. Lets name it CharacterStateBase. But first lets change out Character class like this.

public class Character
{
    private ICharacterState state;

    public ICharacterState State
    {
        get
        {
            return this.state;
        }
        set
        {
            this.state = value;
        }
    }

    public void Update()
    {
        this.State.Update(this);
    }

    public void HandleInput(Input input)
    {
        this.State.HandleInput(this, input);
    }

    // Other code
}

The character has a state. In his Update() method we update his current state. Every state also has a different input handling. In the HandleInput(Input input) method we just make a call to the HandleInput(Character character, Input input) method of the current state.


And now the CharacterStateBase class.

public abstract class CharacterStateBase : ICharacterState
{
    public virtual void OnEnter(Character character) { }

    public virtual void OnExit(Character character) { }

    public virtual void ToState(Character character, ICharacterState targetState)
    {
        character.State.OnExit(character);
        character.State = targetState;
        character.State.OnEnter(character);
    }

    public abstract void Update(Character character);

    public abstract void HandleInput(Character character, Input input);
}

All that is left is to implement the “Grounded”, “Jumping” and “Ducking” states.


public class GroundedCharacterState : CharacterStateBase
{
    // Some code

    public override void HandleInput(Character character, Input input)
    {
        if (input == Input.PRESS_SPACE)
        {
            this.ToState(character, STATE_JUMPING);
        }
        else if (input == Input.PRESS_CTRL)
        {
            this.ToState(character, STATE_DUCKING);
        }

        // More code
    }

    public override void Update(Character character)
    {
        // Some code
    }
}

public class JumpingCharacterState : CharacterStateBase
{
    // Some code

    public override void HandleInput(Character character, Input input)
    {
        // Some code
    }

    public override void Update(Character character)
    {
        if (character.IsGrounded())
        {
            this.ToState(character, STATE_GROUNDED);
        }

        // More code
    }
}

public class DuckingCharacterState : CharacterStateBase
{
    // Some code

    public override void HandleInput(Character character, Input input)
    {
        if (input == Input.RELEASE_CTRL)
        {
            this.ToState(character, STATE_GROUNDED);
        }

        // More code
    }

    public override void Update(Character character)
    {
        // Some code
    }
}

The STATE_GROUNDED, STATE_JUMPING and STATE_DUCKING are just references to instances of GroundedCharacterState, JumpingCharacterState and DuckingCharacterState. You can create them anywhere you want. I personally like to create static readonly instances in the CharacterStateBase class.


I personally love this pattern. It’s very easy to extent the behavior of the character, we just need to create a bunch of different states. Once created we don’t touch them anymore. But as good as it is, there are also problems.

Concurrent State Machines

Lets imagine that the character is running. He is in a running state. But can he run and shoot at the same time? The problem is that only one state can be active at a time. The character can’t run and shoot at the same time, but we want him to be able to do so. One solution is to create a state that combines both the running and the shooting states. That however is not a very good solution. Imagine that the character can shoot while jumping, ducking, walking. Even worse – the character can shoot with different types of weapons (pistols, rifles, grenade launchers). The input handling for these weapons is a little different from one another. If we are to create that many combined states, we will end up overkilling the architecture of our code. A better solution is to create a secondary state, that can be updated separately from the main state. The character class will look like this.

public class Character
{
    private ICharacterState state;
    private ICharacterState equipmentState;

    public void Update()
    {
        this.State.Update(this);
        this.EquipmentState.Update(this);
    }

    public void HandleInput(Input input)
    {
        this.State.HandleInput(this, input);
        this.EquipmentState.HandleInput(this, input);
    }

    // Other code
}

When to Use

There is not a strict rule when to use it. This applies to all patterns in general. You need to ask yourself three questions:

  • Do you have an entity whose behavior changes based on some internal state?
  • Can that state be rigidly divided into one of a relatively small number of distinct options?
  • Does the entity respond to a series of inputs or events over time?

If the answer to all questions is a “YES” then you might consider using this pattern.

I’ve used it for simple AI behaviors. You can actually check this Video Tutorial from Unity Technologies. A guy shows how to implement a basic state machine for AI. However if you want to create a more complex AI, I advise you to use Behavior Trees. I’ve actually never used them myself, but I know that they are the right way to do more advanced AI.

I’ve also used the state pattern when I was implementing the UI in the main menu of a certain game. I had a bunch of screens and you can go from one screen to another, based on some user input. Each state is a different UI Screen. Based on the user input I just make transitions between the screens.

A Description of the C++ “typename” keyword

Hi guys, I found a really cool post about the description of the typename keyword in C++, so I decided to repost. Here is the original post

A Secondary Use

There is a use of typename that is entirely distinct from the main focus of this discussion. I will present it first because it is easy. It seems to me that someone said “hey, since we’re adding typename anyway, why not make it do this” and people said “that’s a good idea.”

Most older C++ books, when discussing templates, use syntax such as the following:

template <class T> ...

I know when I was starting to learn templates, at first I was a little thrown by the fact that T was prefaced by class, and yet it was possible to instantiate that template with primitive types such as int. The confusion was very short-lived, but the use of class in that context never seemed to fit entirely right. Fortunately for my sensibilities, it is also possible to use typename:

template <typename T> ...

This means exactly the same thing as the previous instance. The typename and class keywords can be used interchangeably to state that a template parameter is a type variable (as opposed to a non-type template parameter).

I personally like to use typename in this context because I think it’s ever-so-slightly clearer. And maybe not so much “clearer” as just conceptually nicer. (I think that good names for things are very important.) Some C++ programmers share my view, and use typename for templates. (However, later we will see how it’s possible that this decision can hurt readability.) Some programmers make a distinction between templates that are fully generic (such as the STL containers) and more special purpose ones that can only take certain classes, and use typename for the former category and class for the latter. Others use class exclusively. This is just a style choice.

However, while I use typename in real code, I will stick to class in this document to reduce confusion with the other use of typename.

The real reason for typename

This discussion I think follows fairly closely appendix B from the book C++ Template Metaprogramming: Concepts, Tools, and Techniques from Boost and Beyond by David Abrahams and Aleksey Gurtovoy, though I don’t have it in front of me now. If there are any deficiencies in my discussion of the issues, that book contains the clearest description of them that I’ve seen.

Some definitions

There are two key concepts needed to understand the description of typename, and they are qualified and dependent names.

Qualified and unqualified names

A qualified name is one that specifies a scope. For instance, in the following C++ program, the references to cout and endl are qualified names:

#include <iostream>

int main()  {
   std::cout << "Hello world!" << std::endl;
}

In both cases, the use of cout and endl began with std::.

Had I decided to bring cout and endl into scope with a using declaration or directive*, and used just cout by itself, they would have been unqualified names, because they would lack the std::.

(* Remember, a using declaration is like using std::cout;, and actually introduces the name cout into the scope that the using appears in. A using directive is of the form using namespace std; and makes names visible but doesn’t introduce anything. [I’m not sure this is true. Just a warning.])

Note, however, that if I had brought them into scope with using but still used std::cout, it remains a qualified name. The qualified-ness of a name has nothing to do with what scope it’s used in, what names are visible at that point of the program etc.; it is solely a statement about the name that was used to reference the entity in question. (Also note that there’s nothing special about std, or indeed about namespaces at all. vector::iterator is a nested name as well.)

Dependent and non-dependent names

A dependent name is a name that depends on a template parameter. Suppose we have the following declaration (not legal C++):

template <class T>
class MyClass {
   int i;
   vector<int> vi;
   vector<int>::iterator vitr;

   T t;
   vector<T> vt;
   vector<T>::iterator viter;
};

The types of the first three declarations are known at the time of the template declaration. However, the types of the second set of three declarations are not known until the point of instantiation, because they depend on the template parameter T.

The names T, vector, and vector::iterator are called dependent names, and the types they name are dependent types. The names used in the first three declarations are called non-dependent names, at the types are non-dependent types.

The final complication in what’s considered dependent is that typedefs transfer the quality of being dependent. For instance:

typedef T another_name_for_T;

another_name_for_T is still considered a dependent name despite the type variable T from the template declaration not appearing.

Some other issues of wording

Note that while there is a notion of a dependent type, there is not a notion of a qualified type. A type can be unqualified in one instance, and qualified the next; the qualification is a property of a particular naming of a type, not of the type itself. (Indeed, when a type is first defined, it is always unqualified.)

However, it will be useful to refer to a qualified type; what I mean by this is a qualified name that refers to a type. I will switch back to the more precise wording when I talk about the rules of typename.

The problem

So now we can consider the following example:

template <class T>
void foo() {
   T::iterator * iter;
   ...
}

What did the programmer intend this bit of code to do? Probably, what the programmer intended was for there to be a class that defined a nested type called iterator:

class ContainsAType {
   class iterator { ... }:
   ...
};

and for foo to be called with an instantiation of T being that type:

foo<ContainsAType>();

In that case, then line 3 would be a declaration of a variable called iter that would be a pointer to an object of type T::iterator (in the case of ContainsAType, int*, making iter a double-indirection pointer to an int). So far so good.

However, what the programmer didn’t expect is for someone else to come up and declare the following class:

class ContainsAValue {
   static int iterator;
};

and call foo instantiated with it:

foo<ContainsAValue>();

In this case, line 3 becomes a statement that evaluates an expression which is the product of two things: a variable called iter (which may be undeclared or may be a name of a global) and the static variable T::iterator.

Uh oh! The same series of tokens can be parsed in two entirely different ways, and there’s no way to disambiguate them until instantiation. C++ frowns on this situation. Rather than delaying interpretation of the tokens until instantiation, they change the language:

Before a qualified dependent type, you need typename

To be legal, assuming the programmer intended line 3 as a declaration, they would have to write

template <class T>
void foo() {
   typename T::iterator * iter;
   ...
}

Without typename, there is a C++ parsing rule that says that qualified dependent names should be parsed as non-types even if it leads to a syntax error. Thus if there was a variable called iter in scope, the example would be legal; it would just be interpreted as multiplication. Then when the programmer instantiated foo with ContainsAType, there would be an error because you can’t multiply something by a type.

typename states that the name that follows should be treated as a type. Otherwise, names are interpreted to refer to non-types.

This rule even holds if it doesn’t make sense even if it doesn’t make sense to refer to a non-type. For instance, suppose we were to do something more typical and declare an iterator instead of a pointer to an iterator:

template <class T>
void foo() {
   typename T::iterator iter;
   ...
}

Even in this case, typename is required, and omitting it will cause compile error. As another example, typedefs also require use:

template <class T>
void foo() {
   typedef typename T::iterator iterator_type;
   ...
}

The rules

Here, in excruciating detail, are the rules for the use of typename. Unfortunately, due to something which is hopefully not-contagious apparently affecting the standards committee, they are pretty complicated.

  1. typename is prohibited in each of the following scenarios:
    • Outside of a template definition. (Be aware: an explicit template specialization (more commonly called a total specialization, to contrast with partial specializations) is not itself a template, because there are no missing template parameters! Thus typename is always prohibited in a total specialization.)
    • Before an unqualified type, like int or my_thingy_t.
    • When naming a base class. For example, template class my_class : C::some_base_type { ... }; may not have a typename before C::some_base_type.
    • In a constructor initialization list.
  2. typename is mandatory before a qualified, dependent name which refers to a type (unless that name is naming a base class, or in an initialization list).
  3. typename is optional in other scenarios. (In other words, it is optional before a qualified but non-dependent name used within a template, except again when naming a base class or in an initialization list.)
    Again, these rules are for standard C++98/03. C++11 loosens the restrictions. I will update this page after I figure out what they are.

Abstract Input System in Unity

Right now I am creating a game. For this game I wanted to create a good input system. The thing is I didn’t know where to start. I am a big fan of Ori and the Blind Forest, so I decided to decompile the game and see how the big guys did it. As expected, their code was huge, but I took only the parts for my needs.

Interfaces

There are 2 basic interfaces for taking raw input: IAxisInput and IButtonInput.

public interface IAxisInput
{
    float GetAxis();
}

public interface IButtonInput
{
    bool GetButton(); // When the button is held down
    bool GetButtonDown(); // Executed once on button down
    bool GetButtonUp(); // Executed once on button up
}

For the next interface you need to know exactly what the character can do. In my case the character can only move horizontally and jump, so the interface looks like this.

public interface IInputProvider
{
    IAxisInput HorizontalAxisInput { get; }
    IButtonInput JumpButtonInput { get; }
}

This interface provides us with input from different sources. For example, we can create a KeyboardAndMouseInputProvider, or a MobileInputProvider. Lets actually implement those two.

KeyboardAndMouseInputProvider

public class KeyboardAndMouseInputProvider : IInputProvider
{
    private IAxisInput horizontalAxisInput;
    private IButtonInput jumpButtonInput;

    public KeyboardAndMouseInputProvider()
    {
        this.horizontalAxisInput = new CHorizontalAxisInput();
        this.jumpButtonInput = new CJumpButtonInput();
    }

    public virtual IAxisInput HorizontalAxisInput
    {
        get
        {
            return this.horizontalAxisInput;
        }
    }

    public virtual IButtonInput JumpButtonInput
    {
        get
        {
            return this.jumpButtonInput;
        }
    }

    private class CHorizontalAxisInput : IAxisInput
    {
        public float GetAxis()
        {
            return Input.GetAxis("Horizontal");
        }
    }

    private class CJumpButtonInput : IButtonInput
    {
        public bool GetButton()
        {
            return Input.GetButton("Jump");
        }

        public bool GetButtonDown()
        {
            return Input.GetButtonDown("Jump");
        }

        public bool GetButtonUp()
        {
            return Input.GetButtonUp("Jump");
        }
    }
}

MobileInputProvider

public class MobileInputProvider : MonoBehaviour, IInputProvider
{
    [SerializeField]
    private VirtualJoystick leftJoystick = null;

    private IAxisInput horizontalAxisInput;
    private IButtonInput jumpButtonInput;

    public virtual IAxisInput HorizontalAxisInput
    {
        get
        {
            return this.horizontalAxisInput;
        }
    }

    public virtual IButtonInput JumpButtonInput
    {
        get
        {
            return this.jumpButtonInput;
        }
    }

    public void Init()
    {
        this.horizontalAxisInput = new CHorizontalAxisInput(this.leftJoystick);
        this.jumpButtonInput = new CJumpButtonInput();
    }

    private class CHorizontalAxisInput : IAxisInput
    {
        private VirtualJoystick leftJoystick;

        public CHorizontalAxisInput(VirtualJoystick leftJoystick)
        {
            this.leftJoystick = leftJoystick;
        }

        public float GetAxis()
        {
            return this.leftJoystick.GetAxes().x;
        }
    }

    private class CJumpButtonInput : IButtonInput
    {
        private int lastJumpTouchId;

        public bool GetButton()
        {
            if (Input.touchCount > 0)
            {
                foreach (var touch in Input.touches)
                {
                    if ((touch.phase == TouchPhase.Stationary || touch.phase == TouchPhase.Moved) &&
                        (touch.position.x > Screen.width / 2f) &&
                        (touch.fingerId == this.lastJumpTouchId))
                    {
                        return true;
                    }
                }
            }

            return false;
        }

        public bool GetButtonDown()
        {
            if (Input.touchCount > 0)
            {
                foreach (var touch in Input.touches)
                {
                    if (touch.phase == TouchPhase.Began &&
                        touch.position.x > Screen.width / 2f)
                    {
                        this.lastJumpTouchId = touch.fingerId;
                        return true;
                    }
                }
            }

            return false;
        }

        public bool GetButtonUp()
        {
            if (Input.touchCount > 0)
            {
                foreach (var touch in Input.touches)
                {
                    if (touch.phase == TouchPhase.Ended &&
                        touch.position.x > Screen.width / 2f &&
                        touch.fingerId == this.lastJumpTouchId)
                    {
                        return true;
                    }
                }
            }

            return false;
        }
    }
}

Another layer of abstraction

In Unity if we want to get an axis we just do it like this.

float horizontalAxis = Input.GetAxis("Horizontal");

But we can’t get the the horizontal axis like that if we are on a mobile device. We have a MobileInputProvider, we just need a class that uses it.

public static class PlayerInput
{
    public static IInputProvider InputProvider { get; set; }

    public static IAxisInput HorizontalAxisInput
    {
        get
        {
            return InputProvider.HorizontalAxisInput;
        }
    }

    public static IButtonInput JumpButtonInput
    {
        get
        {
            return InputProvider.JumpButtonInput;
        }
    }
}

 
Now we can get the horizontal axis from a mobile device like this.

PlayerInput.InputProvider = mobileInputProvider;
float horizontalAxis = PlayerInput.HorizontalAxisInput.GetAxis();

Compound Input Provider

But what if we want to be able to get input both from a keyboard and from a mobile device. Well we need a provider that gets input from both, but that will be kinda stupid, because we have them in separate, why create a third provider that is copy-paste from the first two? We just need to think of a smart way to combine both input providers. That is how we do it.
 
First we create an axis input that can get axes from many sources. We will call this one CompoundAxisInput. Here is the implementation.

public class CompoundAxisInput : IAxisInput
{
    private const float AXIS_DEAD_ZONE = 0.2f;

    private IAxisInput[] axisInputs;
    private int lastPressedIndex;

    public CompoundAxisInput() { }

    public CompoundAxisInput(params IAxisInput[] axisInputs)
    {
        this.axisInputs = axisInputs;
    }

    public virtual float GetAxis()
    {
        float positiveAxis = 0f;
        float negativeAxis = 0f;
        if (this.axisInputs != null)
        {
            for (int i = 0; i < this.axisInputs.Length; i++)
            {
                float value = this.axisInputs[i].GetAxis();
                if (Mathf.Abs(value) > AXIS_DEAD_ZONE)
                {
                    this.lastPressedIndex = i;
                }
                else
                {
                    continue;
                }

                if (value < 0f)
                {
                    negativeAxis = Mathf.Min(negativeAxis, value);
                }
                else
                {
                    positiveAxis = Mathf.Max(positiveAxis, value);
                }
            }
        }

        return positiveAxis + negativeAxis;
    }

    public IAxisInput GetLastPressed()
    {
        return this.axisInputs[this.lastPressedIndex];
    }

    public void AddAxisInput(IAxisInput axisInput)
    {
        if (this.axisInputs == null)
        {
            this.axisInputs = new IAxisInput[1];
            this.axisInputs[0] = axisInput;
        }
        else
        {
            Array.Resize(ref this.axisInputs, this.axisInputs.Length + 1);
            this.axisInputs[this.axisInputs.Length - 1] = axisInput;
        }
    }

    public void ClearAxisInputs()
    {
        this.axisInputs = null;
    }
}

It’s an axis input that internally has an array of axis inputs. When we call the GetAxis() method, we find the most negative one and most positive one from all of the axis inputs and return the sum of them. That way if we press left on a keyboard and right on a joystick for example, the character will stay in one place, because the horizontal axis will be zero.


Now we have to do the same for the button input. Lets call the class CompoundButtonInput.

public class CompoundButtonInput : IButtonInput
{
    private IButtonInput[] buttonInputs;
    private int lastPressedIndex;

    public CompoundButtonInput() { }

    public CompoundButtonInput(params IButtonInput[] buttonInputs)
    {
        this.buttonInputs = buttonInputs;
    }

    public virtual bool GetButton()
    {
        if (this.buttonInputs != null)
        {
            for (int i = 0; i < this.buttonInputs.Length; i++)
            {
                if (this.buttonInputs[i].GetButton())
                {
                    this.lastPressedIndex = i;
                    return true;
                }
            }
        }

        return false;
    }

    public virtual bool GetButtonDown()
    {
        if (this.buttonInputs != null)
        {
            for (int i = 0; i < this.buttonInputs.Length; i++)
            {
                if (this.buttonInputs[i].GetButtonDown())
                {
                    this.lastPressedIndex = i;
                    return true;
                }
            }
        }

        return false;
    }

    public virtual bool GetButtonUp()
    {
        if (this.buttonInputs != null)
        {
            for (int i = 0; i < this.buttonInputs.Length; i++)
            {
                if (this.buttonInputs[i].GetButtonUp())
                {
                    this.lastPressedIndex = i;
                    return true;
                }
            }
        }

        return false;
    }

    public IButtonInput GetLastPressed()
    {
        return this.buttonInputs[this.lastPressedIndex];
    }

    public void AddButtonInput(IButtonInput buttonInput)
    {
        if (this.buttonInputs == null)
        {
            this.buttonInputs = new IButtonInput[1];
            this.buttonInputs[0] = buttonInput;
        }
        else
        {
            Array.Resize(ref this.buttonInputs, this.buttonInputs.Length + 1);
            this.buttonInputs[this.buttonInputs.Length - 1] = buttonInput;
        }
    }

    public void ClearButtonInputs()
    {
        this.buttonInputs = null;
    }
}

Finally we create a CompoundInputProvider

public class CompoundInputProvider : IInputProvider
{
    private IInputProvider[] inputProviders;
    private CompoundAxisInput horizontalAxisInput;
    private CompoundButtonInput jumpButtonInput;

    public CompoundInputProvider()
        : this(null)
    { }

    public CompoundInputProvider(params IInputProvider[] inputProviders)
    {
        this.horizontalAxisInput = new CompoundAxisInput();
        this.jumpButtonInput = new CompoundButtonInput();

        if (inputProviders != null)
        {
            for (int i = 0; i < inputProviders.Length; i++)
            {
                this.AddInputProvider(inputProviders[i]);
            }
        }
    }

    public virtual IAxisInput HorizontalAxisInput
    {
        get
        {
            return this.horizontalAxisInput;
        }
    }

    public virtual IButtonInput JumpButtonInput
    {
        get
        {
            return this.jumpButtonInput;
        }
    }

    public void AddInputProvider(IInputProvider inputProvider)
    {
        if (this.inputProviders == null)
        {
            this.inputProviders = new IInputProvider[1];
            this.inputProviders[0] = inputProvider;
        }
        else
        {
            Array.Resize(ref this.inputProviders, this.inputProviders.Length + 1);
            this.inputProviders[this.inputProviders.Length - 1] = inputProvider;
        }

        this.horizontalAxisInput.AddAxisInput(inputProvider.HorizontalAxisInput);
        this.jumpButtonInput.AddButtonInput(inputProvider.JumpButtonInput);
    }

    public void ClearInputProviders()
    {
        this.inputProviders = null;
        this.horizontalAxisInput.ClearAxisInputs();
        this.jumpButtonInput.ClearButtonInputs();
    }
}

All that’s left is to provide our PlayerInput class with the right CompoundInputProvider. I do this in an InputManager script.

public class InputManager : MonoBehaviour
{
    [SerializeField]
    private MobileInputProvider mobileInputProvider = null;

    protected virtual void Awake()
    {
        this.InitInputProvider();
    }

    private void InitInputProvider()
    {
        CompoundInputProvider compoundInputProvider = new CompoundInputProvider();
        if (this.mobileInputProvider != null)
        {
            this.mobileInputProvider.Init();
            compoundInputProvider.AddInputProvider(this.mobileInputProvider);
        }

#if UNITY_EDITOR
        compoundInputProvider.AddInputProvider(new KeyboardAndMouseInputProvider());
#endif

        PlayerInput.InputProvider = compoundInputProvider;
    }
}

Now we are ready to use our PlayerInput class instead of the Input class that Unity gives us.

Dynamic Queue Implementation – C#

A dynamic queue is a queue that is implemented with nodes. Nodes consist of two things: value and link to another node.

The following image illustrates the implementation:

dynamic-queue

The most left node is the front of the queue, and the most right one is the back of the queue. Every node is connected to the one right of it. The back of the queue points to null.

You can see the implementation of the queue here.
Lets jump to the explanation.


First lets see how the Node is implemented.

private class Node
{
	public T Item { get; set; }
	public Node Next { get; set; }

	public Node(T item)
	{
		this.Item = item;
		this.Next = null;
	}

	public Node(T item, Node previous)
	{
		this.Item = item;
		this.Next = null;
		previous.Next = this;
	}
}

We have an Item which represents the value of the node. The link is a simple reference to a node and is called Next. We also have two constructors. One that creates a node with some item and has a pointer to null. The other one creates the same node, but the difference is that a previous node is linked to the one that was just created. The Node class is a private class in the Queue class which I called CustomQueue.


Now lets jump to the CustomQueue.
Lets see what fields, constructors and properties we have.

private Node front;
private Node back;
private int count;

public CustomQueue()
{
	this.front = null;
	this.back = null;
	this.count = 0;
}

public int Count
{
	get
	{
		return this.count;
	}
}

We have references(pointers) to the front and the back of the queue. There is a count field that has a Count property with getter only (we don’t want to mess up the count from the outside). We also have only a single default constructor that makes an empty queue by initializing the front and the back with null and count with 0.


Now lets see the basic methods.

public void Enqueue(T item)
{
	if (this.front == null)
	{
		// We have empty queue
		this.front = new Node(item);
		this.back = this.front;
	}
	else
	{
		Node newNode = new Node(item, this.back);
		this.back = newNode;
	}

	this.count++;
}

The “Enqueue” method adds a new element to the front of the queue. First we check if the queue is empty (if so we make a queue with only one node that points to null). If the queue is not empty, we create a new node and tell the back of the queue to start pointing at the node we’ve just created. This is accomplished with the second constructor. We have to tell that the new back of the queue is the new node. Last we increment the count.

Consider the following code:

CustomQueue<int> queue = new CustomQueue<int>();
queue.Enqueue(1);
queue.Enqueue(2);
queue.Enqueue(3);

In the memory that looks much like this:

enqueue


public T Dequeue()
{
	if (this.count == 0)
	{
		// We have empty queue
		throw new InvalidOperationException("The queue is empty");
	}

	T result = this.front.Item;
	this.front = this.front.Next;
	this.count--;

	return result;
}

The “Dequeue” method removes the front of the queue and returns the value of it. We first make a check if the queue is empty (if so we throw an InvalidOperationExceltion). If the queue is not empty, then we remove the front. It’s simple, we just initialize the front with it’s link. The garbage collector will take care of the node that is discarded from the queue. We also have to decrement the count and return the result (the value of the removed element).

Consider the following code:

CustomQueue<int> queue = new CustomQueue<int>();
queue.Enqueue(1);
queue.Enqueue(2);
queue.Enqueue(3);

queue.Dequeue();
queue.Dequeue();
queue.Dequeue();

The dequeue process should look something like this:

dequeue


public T Peek()
{
	if (this.count == 0)
	{
		// We have empty queue
		throw new InvalidOperationException("The queue is empty");
	}

	return this.front.Item;
}

The “Peek” method gets the value of the front of the queue. Again there is a check for empty queue and an exception throw if it’s empty.


public void Clear()
{
	this.front = null;
	this.back = null;
	this.count = 0;
}

The “Clear” method clears the queue (makes it empty). It’s just like the constructor. We initialize the front and the back with null and the count with 0.


CustomQueue implements the ICloneable interface. It’s useful to clone the queue sometimes.

public object Clone()
{
	CustomQueue<T> clone = new CustomQueue<T>();

	Node currentNode = this.front;
	while (currentNode != null)
	{
		// We have non-empty queue
		clone.Enqueue(currentNode.Item);
		currentNode = currentNode.Next;
	}

	return clone;
}

The “Clone” method creates a deep copy of the queue. How do we do that? We create an empty queue named “clone”. If the original queue is empty we just return the empty clone queue. If it is not empty however, we have to make the deep copy. It’s very simple. We have a reference(node) called “currentNode” that first points to the front of the original queue. This node helps us to walk through the original queue from the front to the back. We say this: “while currentNode != null (we haven’t reached the end of the queue) – enqueue the value of the current node we’ve reached into the clone queue and go to the next node of the original queue”. Then we return the clone.

It looks like this:

queue-clone-process


I’ve also added some extension methods in the CustomQueue class. They are helpful, plus helped me for the unit tests.

public override string ToString()
{
	StringBuilder result = new StringBuilder();

	Node currentNode = this.front;
	while (currentNode != null)
	{
		result.Append(currentNode.Item);
		currentNode = currentNode.Next;
	}

	return result.ToString();
}

public T[] ToArray()
{
	T[] result = new T[this.count];

	Node currentNode = this.front;
	for (int i = 0; i < result.Length; i++)
	{
		result[i] = currentNode.Item;
		currentNode = currentNode.Next;
	}

	return result;
}

“ToString” and “ToArray” are much like the clone method. We are walking through the original queue and the value of the current node we’ve reached is appended in a StringBuilder in the first case, and put in an array in the second case.


The CustomQueue also implements the IEnumerable<T> interface so that the queue can be walked with a foreach loop.

public IEnumerator<T> GetEnumerator()
{
	Node currentNode = this.front;
	while (currentNode != null)
	{
		T result = currentNode.Item;
		currentNode = currentNode.Next;

		yield return result;
	}
}

IEnumerator IEnumerable.GetEnumerator()
{
	return this.GetEnumerator();
}

The IEnumerable and IEnumerator interfaces are hard to explain and this post does not concern them, so I will stop here. Maybe I will make a post on how to implement these interfaces the hard way and the easy way (here I’ve used the easy way). That’s all. Hope it was useful.

Snake Game with JavaScript

I will show you how to make a snake game very easy with pure JavaScript and Canvas. Here’s the demo and the full source

I will explain about the score system last. Lets first see how the snake is implemented. First of all it’s good to place the full JavaScript code into a clojure. That way all the variables are not global.

It should look something like that:

(function () {
    // The full source here
}());

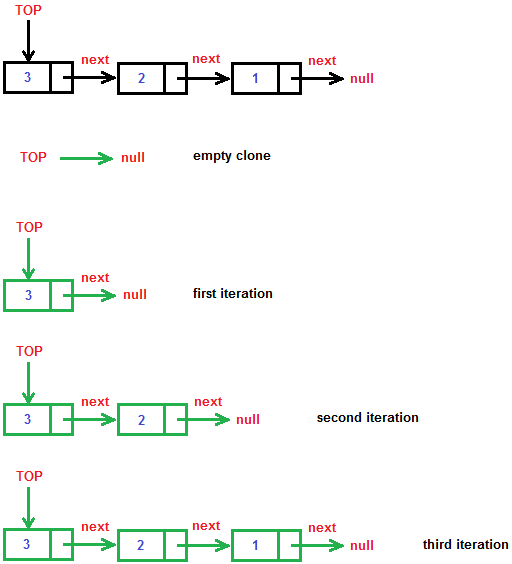
Ok now. Lets start. What do we need for a snake game? We need a queue (for the snake body). I’ve made a simple queue implementation that looks like this:

function Queue() {
	var that = this;
	that.arr = [];
}

Queue.prototype = {
	constructor: Queue,

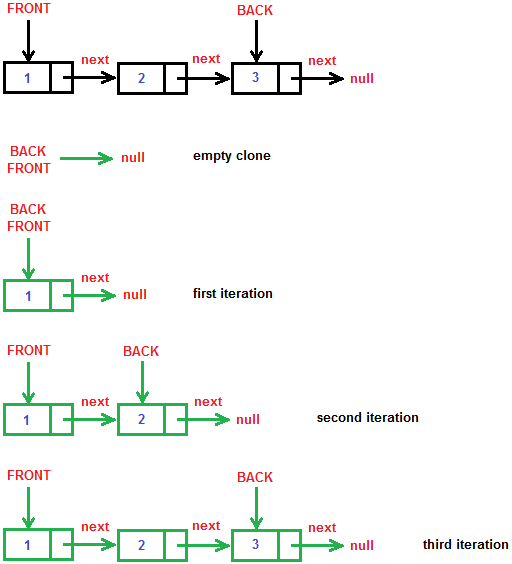
	enqueue: function (elem) {
		this.arr.push(elem);
	},

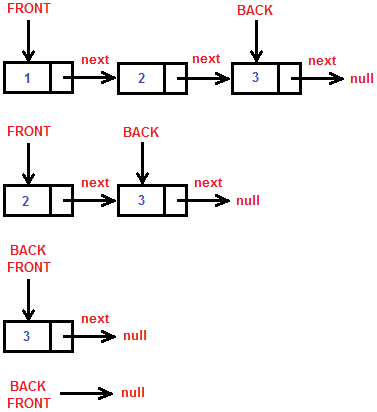
	dequeue: function () {
		var retValue = this.arr[0];
		var newArr = new Array(this.arr.length - 1);
		for (var i = 0; i < newArr.length; i++) {
			newArr[i] = this.arr[i + 1];
		}

		this.arr = newArr;
		return retValue;
	},

	getFirstElem: function () {
	    return this.arr[0];
	},

	getLastElem: function () {
	    return this.arr[this.arr.length - 1];
	},

	elementAt: function (index) {
	    return this.arr[index];
	},

	length: function () {
		return this.arr.length;
	}
}

As you can see it’s not a basic queue implementation. We have functions to get elements at any index, to get the first and last elements. I don’t think there is something special about it. Just a queue.


We also need coordinates. You can consider the playfield as a coordinate system. You can think of the “Coords” class as a “Vector” class.

function Coords(x, y) {
	var that = this;
	that.x = x * 10;
	that.y = y * 10;
}

Ok now. You may ask why the “x” and “y” are multiplied by 10?
It’s simple. The coordinates are actually pixels on the screen. If the step of the snake is only 1 pixel it will be almost impossible to tell that the snake even moved. That’s why I made the step 10 pixels. When the snake head moves from coordinates (10, 20) to (20, 20) you will definitely see it moving. This is a bad approach, because the constructor is modifying the values, we just gave him. I am making this for simplicity. Just note that internally the values are multiplied by 10.


Ok. We can’t make a snake game without a snake can we?

function Snake(x, y, bodyLength) {
	var that = this;
	that.snakeBody = new Queue();
	for (var i = 0; i < bodyLength; i++) {
		that.snakeBody.enqueue(new Coords(x + i, y));
	}

	that.currentDirection = new Coords(1, 0);
	that.head = that.snakeBody.getLastElem();
}

Snake.prototype = {
    constructor: Snake,

    getHead: function () {
        return this.head;
    },

    getNextHead: function () {
        var nextHead =
            new Coords(
                parseInt(this.head.x + this.currentDirection.x) / 10,
                parseInt(this.head.y + this.currentDirection.y) / 10
            );

        return nextHead;
    },

    move: function () {
        var nextHead = this.getNextHead();
        this.snakeBody.enqueue(nextHead);
        this.snakeBody.dequeue();

        this.head = nextHead;
    },

    turnLeft: function () {
        if (this.currentDirection.x !== 1 && this.currentDirection.y !== 0) {
            var leftDirection = new Coords(-1, 0);
            this.currentDirection = leftDirection;
        }
    },

    turnRight: function () {
        if (this.currentDirection.x !== -1 && this.currentDirection.y !== 0) {
            var rightDirection = new Coords(1, 0);
            this.currentDirection = rightDirection;
        }
    },

    turnUp: function () {
        if (this.currentDirection.x !== 0 && this.currentDirection !== 1) {
            var upDirection = new Coords(0, -1);
            this.currentDirection = upDirection;
        }
    },

    turnDown: function () {
        if (this.currentDirection.x !== 0 && this.curentDirection !== -1) {
            var downDirection = new Coords(0, 1);
            this.currentDirection = downDirection;
        }
    }
}

Lets see what we have in the constructor?
We have a snake body, which is a queue of coordinates. The snake also has a head and current direction. The current direction is also a coordinate. All of the possible directions are:

var leftDirection = new Coords(-1, 0);
var rightDirection = new Coords(1, 0);
var upDirection = new Coords(0, -1);
var downDirection = new Coords(0, 1);

It’s very simple. The left direction has x = -1 and y = 0. The coordinate system is a normal coordinate system (just how you know it from Math). If the snake head is at coordinates (5, 5) and we add the leftDirection speed vector to it, the snake head will go to coordinates (4, 5). That’s the secret of mooving objects in a coordinate system. However the snake moves differently. I will explain when the time comes.


First lets see what methods(functions) the snake has:

getHead: function () {
    return this.head;
}

There is not need to tell you what this function does.


getNextHead: function () {
    var nextHead =
        new Coords(
            parseInt(this.head.x + this.currentDirection.x) / 10,
            parseInt(this.head.y + this.currentDirection.y) / 10
        );

    return nextHead;
}

This function returnes the next head of the snake. What does that mean? At any state of the game the snake has a current direction. Lets imagine that the snake head is at coordinates (5, 5) and the currentDirection is (-1, 0). The next head of the snake will be on (5, 5) + (-1, 0) = (4, 5) coordinates. The getNextHead function is needed because we want to know if the snake will reach it’s body or one of the side wall before it actually happened. This function helps us in many ways (even for the moving of the snake). You may ask why I am dividing the the “x” and “y” coordinates of the nextHead by 10? Do you remember that the coordinates are actually multiplied by 10? If we say “var nextHead = new Coords(4, 5)” the coordinates will actually be (40, 50). We want them to be (4, 5). So we are creating the nextHead like this “var nextHead = new Coords(0.4, 0.5)”. That’s all.


move: function () {
    var nextHead = this.getNextHead();
    this.snakeBody.enqueue(nextHead);
    this.snakeBody.dequeue();

    this.head = nextHead;
}

Ok, we’ve finally reached the moving of the snake. It’s tricky here. First of all you have to understand this. The snake head is not the first element of the queue, it’s actually the last element. The tail of the snake is the first element of the queue. Let me explain. When we enqueue a new element to the queue, it is put at the end of queue. When we dequeue an element from the queue, the first element is removed from the queue. I think you are starting to figure it out. How does the snake move? First we want to get the next head of the snake. We already have a nice function for that. We now have the next head. The next thing to do is to put it in the snake’s body “this.snakeBody.enqueue(nextHead)”. Now we have moved the snake. The problem is that the snake is actually bigger now (we just added a new head). So we remove the end of the tail “this.snakeBody.dequeue()”. The next step to do is to assign the snake’s head to the new head “this.head = nextHead”. That’s how the snake moves. I hope you understood it.


Now comes the “change direction functions”.
I will explain only the “turnLeft()” function. The others are analogous.

turnLeft: function () {
    if (this.currentDirection.x !== 1 && this.currentDirection.y !== 0) {
        // currentDirection != rightDirection
        var leftDirection = new Coords(-1, 0);
        this.currentDirection = leftDirection;
    }
}

You may ask why it is so complex? Well we can’t just say “this.currentDirection = leftDirection”. If the current direction is different from rightDirection, then it’s fine. Lets imagine that the currentDirection = rightDirection. If we change it to left the snake head will hit it’s body. That’s why we have a restriction. If the snake current direction is not right direction, then change it, else don’t do anything.


So far, so good.
We need food. The snake needs to eat.

function Food(width, height) {
    var minWidth = 10;
    var maxWidth = width - 10;
    var minHeight = 10;
    var maxHeight = height - 10;

    var x = parseInt((Math.random() * (maxWidth - minWidth) + minWidth) / 10);
    var y = parseInt((Math.random() * (maxHeight - minHeight) + minHeight) / 10);

    this.coords = new Coords(x, y);
}

As you can see the food has coordinates too. The thing is that they must be generated randomly. The food can be generate anywhere on the screen, we however want the food to be generated in the playfield. That’s why we pass as arguments the width and the height of the field. “minWidth = 10”, because the field has borders that are exactly 10 pixels wide. The other min and max widths and heights are analogous. I’ve made everything in the game 10 pixels wide. You already know why we divide the “x” and “y” coordinates by 10.


Now we have almost everything we need for a snake game. What we don’t have is a renderer. For the rendering we’ll use canvas. Canvas is a JavaScript API capable of visualizing 2D ad 3D graphics in the browsed. 3D is not fully implemented yet, but for a snake game 2D is just fine. You can learn more about canvas in Developer Mozilla.

Lets see what functions we have:

function drawField(ctx, width, height) {
    ctx.save();

    ctx.fillStyle = "#000";
    ctx.fillRect(0, 0, width, height);

    ctx.fillStyle = "#00f";
    ctx.strokeStyle = "#000";

    // Draws the upper and lower borders
    for (var i = 0; i < width; i += 10) {
        ctx.fillRect(i, 0, 10, 10);
        ctx.strokeRect(i, 0, 10, 10);

        ctx.fillRect(i, height - 10, 10, 10);
        ctx.strokeRect(i, height - 10, 10, 10);
    }

    // Draws the left and right borders
    for (var i = 0; i < height; i += 10) {
        ctx.fillRect(0, i, 10, 10);
        ctx.strokeRect(0, i, 10, 10);

        ctx.fillRect(width - 10, i, 10, 10);
        ctx.strokeRect(width - 10, i, 10, 10);
    }

    ctx.restore();
}

This function draws the playfield. It fills the background color and draws the border. The border consists of many small squares. You can learn how to use canvas in the link I gave you.


The next is the drawing of the food.

function drawFood(ctx, food) {
    ctx.save();

    ctx.fillStyle = "#0f0";
    ctx.strokeStyle = "#000";
    ctx.fillRect(food.coords.x, food.coords.y, 10, 10);
    ctx.strokeRect(food.coords.x, food.coords.y, 10, 10);

    ctx.restore();
}

We just take the food’s coordinates and fill a 10×10 pixels rectangle there.


And of course the drawing of the snake:

function drawSnake(ctx, snake) {
    ctx.save();

    ctx.fillStyle = "#f00";
    ctx.strokeStyle = "#000";

    var snakeBody = snake.snakeBody;
    for (var i = 0; i < snakeBody.length(); i++) {
        var snakeElem = snakeBody.elementAt(i);
        ctx.fillRect(snakeElem.x, snakeElem.y, 10, 10);
        ctx.strokeRect(snakeElem.x, snakeElem.y, 10, 10);
    }

    ctx.restore();
}

For each element in the snake’s body we fill a 10×10 rectangle at it’s coordinates.


Next thing we need is the logic of the game. It consists of two things: initialization and game loop.

Let us first see the initialization:

var canvas = document.getElementsByTagName("canvas")[0];
var width = canvas.width;
var height = canvas.height;
var ctx = canvas.getContext("2d");

var snake = new Snake(5, 5, 5);
var food = new Food(width, height);
var score = 0;

var scoreDiv = document.getElementById("score");
scoreDiv.style.fontWeight = "bold";
scoreDiv.innerHTML = "Score: " + score;

window.onkeydown = function (ev) {
    switch (ev.keyCode) {
        case 37:
            snake.turnLeft();
            break;
        case 38:
            snake.turnUp();
            break;
        case 39:
            snake.turnRight();
            break;
        case 40:
            snake.turnDown();
            break;
    }
}

First we take the canvas element and get it’s width, height and 2D context.

Next we initialize our snake. The tail is on coordinates (5, 5) and the length of the snake is 5.
Then we generate our food in a field large enough to fit in the canvas.
We also initialize a score. The score is displayed in a div with id=”score”.

Next thing we need is to navigate the snake. That’s accomplished by adding events to the window. The event object has a property called keyCode. When we press a key, that keyCode contains the code of the pressed key. The left, up, right and down arrows codes are 37, 38, 39 and 40.


The next import thing is the game loop.

function run(ctx, snake, width, height) {
    var nextHead = snake.getNextHead();
    var snakeBody = snake.snakeBody;

    // check for collision with itself
    for (var i = 0; i < snakeBody.length(); i++) {
        var elem = snakeBody.elementAt(i);
        if (elem.x === nextHead.x && elem.y === nextHead.y) {
            saveScore(score);
            restartGame();
        }
    }

    // check for collision with side walls
    if (nextHead.x <= 0 ||
            nextHead.x >= width - 10 ||
            nextHead.y <= 0 ||
            nextHead.y >= height - 10) {
        saveScore(score);
        restartGame();
    }

    // check for collision with food
    for (var i = 0; i < snakeBody.length() ; i++) {
        var elem = snakeBody.elementAt(i);
        if (elem.x === food.coords.x && elem.y === food.coords.y) {
            var snakeNextHead = snake.getNextHead();
            snake.snakeBody.enqueue(snakeNextHead);
            snake.head = snakeNextHead;
            food = new Food(width, height);
            score += 100;
            scoreDiv.innerHTML = "Score: " + score;
            break;
        }
    }

    snake.move();
    drawField(ctx, width, height);
    drawFood(ctx, food);
    drawSnake(ctx, snake);
}

This is the function that we want to be executed on every iteration of the game loop. We take the snake’s head and body and check for collisions (with itself, with side walls(border) and with food).
The collisions with itself are easy (if the snake’s nextHead equals some of the snake’s body coordinates, then the snake hit itself). Don’t mind the “saveScore” and “restartGame” functions, I will explain them later.
The collisions with the border are easy too (if the snake’s nextHead equals one of the side walls coordinates, then the snake hit the border).
The collisions with the food are trickier. Imagine that a food is generate on the top of the snake. The snake can’t eat it because it will eat itself too. That’s why I made it like that (if any of the coordinates of the snake’s body equals the food’s coordinates, then the food is eaten). Unfortunately sometimes you will get points just because the food was spawned on the top of the snake. Anyway, when we the snake eats a food, we increase the score by 100, generate a new food and of course we expand the snake. The expanding is just like the moving function, we just don’t remove the end of the tail.
When all of the collisions were dispatched we can finally call the snake’s move() method and draw a frame.

Now we have to put that function into an infinite loop. Infinite loops don’t work in JavaScript, but we have a very nice function for that “setInterval(func, milliseconds)”. setInterval calls “func” every N milliseconds.

function gameLoop() {
    run(ctx, snake, width, height);
}

setInterval(gameLoop, 100);

We are almost ready. If you don’t want to know how the score system is implemented you can just skip this part. But hey, what’s a game without a score system?

First let me show you the restartGame() function.

function restartGame() {
    document.location.reload(false);
}

Very simple. The page is reloaded.

And here is the saveScore(score) function

function saveScore(score) {
    var name = prompt("GAME OVER!\nEnter nickname:");
    if (localStorage[name]) {
        if (localStorage[name] < score) {
            localStorage[name] = score;
        }
    }
    else {
        localStorage[name] = score;
    }
}

When the game is over the player is asked for a nickname and a key->value pair (name->score) is saved in the localStorage of the browser. It’s not the most elegant mechanism, but I wanted to make it as simple as possible. As fast as possible too of course :D. The tricky part is that we need to ask if the played has already signed his name and score. That way if you play and score 100, and on the second play your score is 500, there wont be two scores with a same nickname, your score will just be updated.


How do we display the rank list in the browser?
Well, that’s how!

(function loadTopFiveScores() {
    function Pair(key, value) {
        this.key = key;
        this.value = value;
    }

    var allScores = [];
    for (var prop in localStorage) {
        allScores.push(new Pair(prop, localStorage[prop]));
    }

    // sort the scores
    for (var i = 0; i < allScores.length - 1; i++) {
        var maxScoreIndex = i;
        for (var j = i + 1; j < allScores.length; j++) {
            if (parseInt(allScores[j].value) > parseInt(allScores[maxScoreIndex].value)) {
                maxScoreIndex = j;
            }
        }

        var temp = allScores[i];
        allScores[i] = allScores[maxScoreIndex];
        allScores[maxScoreIndex] = temp;
    }

    // load the top five scores
    var rankList = document.getElementById("rank-list");
    var length;
    if (allScores.length < 5) {
        length = allScores.length;
    }
    else {
        length = 5;
    }

    for (var i = 0; i < length; i++) {
        var div = document.createElement("div");
        div.innerHTML = allScores[i].key + ": " + allScores[i].value;
        rankList.appendChild(div);
    }
})();

Looks frightening, but it’s not. First we make a Pair class (a key->value pair). Then we save all of the key->value pairs in an array called allScore. We sort the scores by value (with simple selection sort algorithm). We also want to display only the top five scores. Well the scores are sorted so we need to take only the last five. For every score we make a div element and append it to the div with id=”rank-list”. If you want to optimize the appending process, you can do it with documentFragment.


I’ve also made a button for clearing the localStorage.

var storageCleanerButton = document.getElementById("storage-clear");
storageCleanerButton.addEventListener("click", clearScore, false);

function clearScore() {
    localStorage.clear();
    var rankList = document.getElementById("rank-list");
    rankList.innerHTML = "Top Five";
}

Congratulations, you’ve reached the end of this huge post 😀