I will show you how to make a snake game very easy with pure JavaScript and Canvas. Here’s the demo and the full source
I will explain about the score system last. Lets first see how the snake is implemented. First of all it’s good to place the full JavaScript code into a clojure. That way all the variables are not global.
It should look something like that:
(function () {
    // The full source here
}());
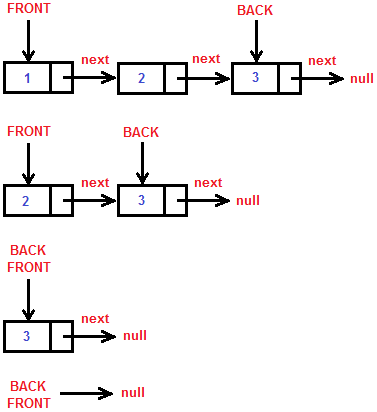
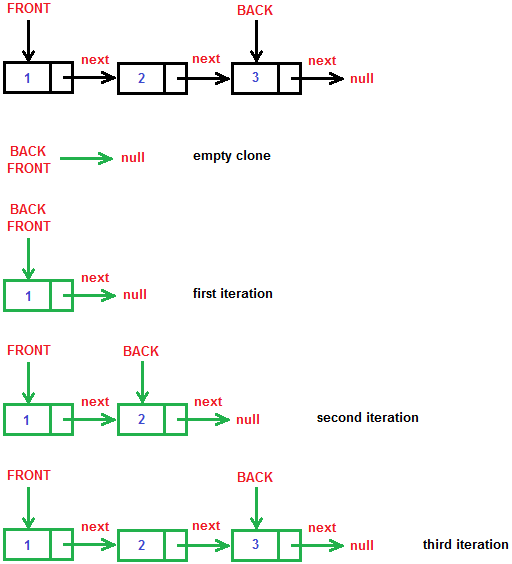
Ok now. Lets start. What do we need for a snake game? We need a queue (for the snake body). I’ve made a simple queue implementation that looks like this:
function Queue() {
	var that = this;
	that.arr = [];
}

Queue.prototype = {
	constructor: Queue,

	enqueue: function (elem) {
		this.arr.push(elem);
	},

	dequeue: function () {
		var retValue = this.arr[0];
		var newArr = new Array(this.arr.length - 1);
		for (var i = 0; i < newArr.length; i++) {
			newArr[i] = this.arr[i + 1];
		}

		this.arr = newArr;
		return retValue;
	},

	getFirstElem: function () {
	    return this.arr[0];
	},

	getLastElem: function () {
	    return this.arr[this.arr.length - 1];
	},

	elementAt: function (index) {
	    return this.arr[index];
	},

	length: function () {
		return this.arr.length;
	}
}
As you can see it’s not a basic queue implementation. We have functions to get elements at any index, to get the first and last elements. I don’t think there is something special about it. Just a queue.
We also need coordinates. You can consider the playfield as a coordinate system. You can think of the “Coords” class as a “Vector” class.
function Coords(x, y) {
	var that = this;
	that.x = x * 10;
	that.y = y * 10;
}
Ok now. You may ask why the “x” and “y” are multiplied by 10?
It’s simple. The coordinates are actually pixels on the screen. If the step of the snake is only 1 pixel it will be almost impossible to tell that the snake even moved. That’s why I made the step 10 pixels. When the snake head moves from coordinates (10, 20) to (20, 20) you will definitely see it moving. This is a bad approach, because the constructor is modifying the values, we just gave him. I am making this for simplicity. Just note that internally the values are multiplied by 10.
Ok. We can’t make a snake game without a snake can we?
function Snake(x, y, bodyLength) {
	var that = this;
	that.snakeBody = new Queue();
	for (var i = 0; i < bodyLength; i++) {
		that.snakeBody.enqueue(new Coords(x + i, y));
	}

	that.currentDirection = new Coords(1, 0);
	that.head = that.snakeBody.getLastElem();
}

Snake.prototype = {
    constructor: Snake,

    getHead: function () {
        return this.head;
    },

    getNextHead: function () {
        var nextHead =
            new Coords(
                parseInt(this.head.x + this.currentDirection.x) / 10,
                parseInt(this.head.y + this.currentDirection.y) / 10
            );

        return nextHead;
    },

    move: function () {
        var nextHead = this.getNextHead();
        this.snakeBody.enqueue(nextHead);
        this.snakeBody.dequeue();

        this.head = nextHead;
    },

    turnLeft: function () {
        if (this.currentDirection.x !== 1 && this.currentDirection.y !== 0) {
            var leftDirection = new Coords(-1, 0);
            this.currentDirection = leftDirection;
        }
    },

    turnRight: function () {
        if (this.currentDirection.x !== -1 && this.currentDirection.y !== 0) {
            var rightDirection = new Coords(1, 0);
            this.currentDirection = rightDirection;
        }
    },

    turnUp: function () {
        if (this.currentDirection.x !== 0 && this.currentDirection !== 1) {
            var upDirection = new Coords(0, -1);
            this.currentDirection = upDirection;
        }
    },

    turnDown: function () {
        if (this.currentDirection.x !== 0 && this.curentDirection !== -1) {
            var downDirection = new Coords(0, 1);
            this.currentDirection = downDirection;
        }
    }
}
Lets see what we have in the constructor?
We have a snake body, which is a queue of coordinates. The snake also has a head and current direction. The current direction is also a coordinate. All of the possible directions are:
var leftDirection = new Coords(-1, 0);
var rightDirection = new Coords(1, 0);
var upDirection = new Coords(0, -1);
var downDirection = new Coords(0, 1);
It’s very simple. The left direction has x = -1 and y = 0. The coordinate system is a normal coordinate system (just how you know it from Math). If the snake head is at coordinates (5, 5) and we add the leftDirection speed vector to it, the snake head will go to coordinates (4, 5). That’s the secret of mooving objects in a coordinate system. However the snake moves differently. I will explain when the time comes.
First lets see what methods(functions) the snake has:
getHead: function () {
    return this.head;
}
There is not need to tell you what this function does.
getNextHead: function () {
    var nextHead =
        new Coords(
            parseInt(this.head.x + this.currentDirection.x) / 10,
            parseInt(this.head.y + this.currentDirection.y) / 10
        );

    return nextHead;
}
This function returnes the next head of the snake. What does that mean? At any state of the game the snake has a current direction. Lets imagine that the snake head is at coordinates (5, 5) and the currentDirection is (-1, 0). The next head of the snake will be on (5, 5) + (-1, 0) = (4, 5) coordinates. The getNextHead function is needed because we want to know if the snake will reach it’s body or one of the side wall before it actually happened. This function helps us in many ways (even for the moving of the snake). You may ask why I am dividing the the “x” and “y” coordinates of the nextHead by 10? Do you remember that the coordinates are actually multiplied by 10? If we say “var nextHead = new Coords(4, 5)” the coordinates will actually be (40, 50). We want them to be (4, 5). So we are creating the nextHead like this “var nextHead = new Coords(0.4, 0.5)”. That’s all.
move: function () {
    var nextHead = this.getNextHead();
    this.snakeBody.enqueue(nextHead);
    this.snakeBody.dequeue();

    this.head = nextHead;
}
Ok, we’ve finally reached the moving of the snake. It’s tricky here. First of all you have to understand this. The snake head is not the first element of the queue, it’s actually the last element. The tail of the snake is the first element of the queue. Let me explain. When we enqueue a new element to the queue, it is put at the end of queue. When we dequeue an element from the queue, the first element is removed from the queue. I think you are starting to figure it out. How does the snake move? First we want to get the next head of the snake. We already have a nice function for that. We now have the next head. The next thing to do is to put it in the snake’s body “this.snakeBody.enqueue(nextHead)”. Now we have moved the snake. The problem is that the snake is actually bigger now (we just added a new head). So we remove the end of the tail “this.snakeBody.dequeue()”. The next step to do is to assign the snake’s head to the new head “this.head = nextHead”. That’s how the snake moves. I hope you understood it.
Now comes the “change direction functions”.
I will explain only the “turnLeft()” function. The others are analogous.
turnLeft: function () {
    if (this.currentDirection.x !== 1 && this.currentDirection.y !== 0) {
        // currentDirection != rightDirection
        var leftDirection = new Coords(-1, 0);
        this.currentDirection = leftDirection;
    }
}
You may ask why it is so complex? Well we can’t just say “this.currentDirection = leftDirection”. If the current direction is different from rightDirection, then it’s fine. Lets imagine that the currentDirection = rightDirection. If we change it to left the snake head will hit it’s body. That’s why we have a restriction. If the snake current direction is not right direction, then change it, else don’t do anything.
So far, so good.
We need food. The snake needs to eat.
function Food(width, height) {
    var minWidth = 10;
    var maxWidth = width - 10;
    var minHeight = 10;
    var maxHeight = height - 10;

    var x = parseInt((Math.random() * (maxWidth - minWidth) + minWidth) / 10);
    var y = parseInt((Math.random() * (maxHeight - minHeight) + minHeight) / 10);

    this.coords = new Coords(x, y);
}
As you can see the food has coordinates too. The thing is that they must be generated randomly. The food can be generate anywhere on the screen, we however want the food to be generated in the playfield. That’s why we pass as arguments the width and the height of the field. “minWidth = 10”, because the field has borders that are exactly 10 pixels wide. The other min and max widths and heights are analogous. I’ve made everything in the game 10 pixels wide. You already know why we divide the “x” and “y” coordinates by 10.
Now we have almost everything we need for a snake game. What we don’t have is a renderer. For the rendering we’ll use canvas. Canvas is a JavaScript API capable of visualizing 2D ad 3D graphics in the browsed. 3D is not fully implemented yet, but for a snake game 2D is just fine. You can learn more about canvas in Developer Mozilla.
Lets see what functions we have:
function drawField(ctx, width, height) {
    ctx.save();

    ctx.fillStyle = "#000";
    ctx.fillRect(0, 0, width, height);

    ctx.fillStyle = "#00f";
    ctx.strokeStyle = "#000";

    // Draws the upper and lower borders
    for (var i = 0; i < width; i += 10) {
        ctx.fillRect(i, 0, 10, 10);
        ctx.strokeRect(i, 0, 10, 10);

        ctx.fillRect(i, height - 10, 10, 10);
        ctx.strokeRect(i, height - 10, 10, 10);
    }

    // Draws the left and right borders
    for (var i = 0; i < height; i += 10) {
        ctx.fillRect(0, i, 10, 10);
        ctx.strokeRect(0, i, 10, 10);

        ctx.fillRect(width - 10, i, 10, 10);
        ctx.strokeRect(width - 10, i, 10, 10);
    }

    ctx.restore();
}
This function draws the playfield. It fills the background color and draws the border. The border consists of many small squares. You can learn how to use canvas in the link I gave you.
The next is the drawing of the food.
function drawFood(ctx, food) {
    ctx.save();

    ctx.fillStyle = "#0f0";
    ctx.strokeStyle = "#000";
    ctx.fillRect(food.coords.x, food.coords.y, 10, 10);
    ctx.strokeRect(food.coords.x, food.coords.y, 10, 10);

    ctx.restore();
}
We just take the food’s coordinates and fill a 10×10 pixels rectangle there.
And of course the drawing of the snake:
function drawSnake(ctx, snake) {
    ctx.save();

    ctx.fillStyle = "#f00";
    ctx.strokeStyle = "#000";

    var snakeBody = snake.snakeBody;
    for (var i = 0; i < snakeBody.length(); i++) {
        var snakeElem = snakeBody.elementAt(i);
        ctx.fillRect(snakeElem.x, snakeElem.y, 10, 10);
        ctx.strokeRect(snakeElem.x, snakeElem.y, 10, 10);
    }

    ctx.restore();
}
For each element in the snake’s body we fill a 10×10 rectangle at it’s coordinates.
Next thing we need is the logic of the game. It consists of two things: initialization and game loop.
Let us first see the initialization:
var canvas = document.getElementsByTagName("canvas")[0];
var width = canvas.width;
var height = canvas.height;
var ctx = canvas.getContext("2d");

var snake = new Snake(5, 5, 5);
var food = new Food(width, height);
var score = 0;

var scoreDiv = document.getElementById("score");
scoreDiv.style.fontWeight = "bold";
scoreDiv.innerHTML = "Score: " + score;

window.onkeydown = function (ev) {
    switch (ev.keyCode) {
        case 37:
            snake.turnLeft();
            break;
        case 38:
            snake.turnUp();
            break;
        case 39:
            snake.turnRight();
            break;
        case 40:
            snake.turnDown();
            break;
    }
}
First we take the canvas element and get it’s width, height and 2D context.
Next we initialize our snake. The tail is on coordinates (5, 5) and the length of the snake is 5.
Then we generate our food in a field large enough to fit in the canvas.
We also initialize a score. The score is displayed in a div with id=”score”.
Next thing we need is to navigate the snake. That’s accomplished by adding events to the window. The event object has a property called keyCode. When we press a key, that keyCode contains the code of the pressed key. The left, up, right and down arrows codes are 37, 38, 39 and 40.
The next import thing is the game loop.
function run(ctx, snake, width, height) {
    var nextHead = snake.getNextHead();
    var snakeBody = snake.snakeBody;

    // check for collision with itself
    for (var i = 0; i < snakeBody.length(); i++) {
        var elem = snakeBody.elementAt(i);
        if (elem.x === nextHead.x && elem.y === nextHead.y) {
            saveScore(score);
            restartGame();
        }
    }

    // check for collision with side walls
    if (nextHead.x <= 0 ||
            nextHead.x >= width - 10 ||
            nextHead.y <= 0 ||
            nextHead.y >= height - 10) {
        saveScore(score);
        restartGame();
    }

    // check for collision with food
    for (var i = 0; i < snakeBody.length() ; i++) {
        var elem = snakeBody.elementAt(i);
        if (elem.x === food.coords.x && elem.y === food.coords.y) {
            var snakeNextHead = snake.getNextHead();
            snake.snakeBody.enqueue(snakeNextHead);
            snake.head = snakeNextHead;
            food = new Food(width, height);
            score += 100;
            scoreDiv.innerHTML = "Score: " + score;
            break;
        }
    }

    snake.move();
    drawField(ctx, width, height);
    drawFood(ctx, food);
    drawSnake(ctx, snake);
}
This is the function that we want to be executed on every iteration of the game loop. We take the snake’s head and body and check for collisions (with itself, with side walls(border) and with food).
The collisions with itself are easy (if the snake’s nextHead equals some of the snake’s body coordinates, then the snake hit itself). Don’t mind the “saveScore” and “restartGame” functions, I will explain them later.
The collisions with the border are easy too (if the snake’s nextHead equals one of the side walls coordinates, then the snake hit the border).
The collisions with the food are trickier. Imagine that a food is generate on the top of the snake. The snake can’t eat it because it will eat itself too. That’s why I made it like that (if any of the coordinates of the snake’s body equals the food’s coordinates, then the food is eaten). Unfortunately sometimes you will get points just because the food was spawned on the top of the snake. Anyway, when we the snake eats a food, we increase the score by 100, generate a new food and of course we expand the snake. The expanding is just like the moving function, we just don’t remove the end of the tail.
When all of the collisions were dispatched we can finally call the snake’s move() method and draw a frame.
Now we have to put that function into an infinite loop. Infinite loops don’t work in JavaScript, but we have a very nice function for that “setInterval(func, milliseconds)”. setInterval calls “func” every N milliseconds.
function gameLoop() {
    run(ctx, snake, width, height);
}

setInterval(gameLoop, 100);
We are almost ready. If you don’t want to know how the score system is implemented you can just skip this part. But hey, what’s a game without a score system?
First let me show you the restartGame() function.
function restartGame() {
    document.location.reload(false);
}
Very simple. The page is reloaded.
And here is the saveScore(score) function
function saveScore(score) {
    var name = prompt("GAME OVER!\nEnter nickname:");
    if (localStorage[name]) {
        if (localStorage[name] < score) {
            localStorage[name] = score;
        }
    }
    else {
        localStorage[name] = score;
    }
}
When the game is over the player is asked for a nickname and a key->value pair (name->score) is saved in the localStorage of the browser. It’s not the most elegant mechanism, but I wanted to make it as simple as possible. As fast as possible too of course :D. The tricky part is that we need to ask if the played has already signed his name and score. That way if you play and score 100, and on the second play your score is 500, there wont be two scores with a same nickname, your score will just be updated.
How do we display the rank list in the browser?
Well, that’s how!
(function loadTopFiveScores() {
    function Pair(key, value) {
        this.key = key;
        this.value = value;
    }

    var allScores = [];
    for (var prop in localStorage) {
        allScores.push(new Pair(prop, localStorage[prop]));
    }

    // sort the scores
    for (var i = 0; i < allScores.length - 1; i++) {
        var maxScoreIndex = i;
        for (var j = i + 1; j < allScores.length; j++) {
            if (parseInt(allScores[j].value) > parseInt(allScores[maxScoreIndex].value)) {
                maxScoreIndex = j;
            }
        }

        var temp = allScores[i];
        allScores[i] = allScores[maxScoreIndex];
        allScores[maxScoreIndex] = temp;
    }

    // load the top five scores
    var rankList = document.getElementById("rank-list");
    var length;
    if (allScores.length < 5) {
        length = allScores.length;
    }
    else {
        length = 5;
    }

    for (var i = 0; i < length; i++) {
        var div = document.createElement("div");
        div.innerHTML = allScores[i].key + ": " + allScores[i].value;
        rankList.appendChild(div);
    }
})();
Looks frightening, but it’s not. First we make a Pair class (a key->value pair). Then we save all of the key->value pairs in an array called allScore. We sort the scores by value (with simple selection sort algorithm). We also want to display only the top five scores. Well the scores are sorted so we need to take only the last five. For every score we make a div element and append it to the div with id=”rank-list”. If you want to optimize the appending process, you can do it with documentFragment.
I’ve also made a button for clearing the localStorage.
var storageCleanerButton = document.getElementById("storage-clear");
storageCleanerButton.addEventListener("click", clearScore, false);

function clearScore() {
    localStorage.clear();
    var rankList = document.getElementById("rank-list");
    rankList.innerHTML = "Top Five";
}
Congratulations, you’ve reached the end of this huge post 😀


