Observer Pattern

What is the observer pattern used for, and why do we need it? If you’ve heard of the Model-View-Controller architectural pattern, let me tell you that underlying that is the Observer pattern. Observer is so widely used that java put it in its core library (java.util.Observer) and C# baked it right into the language (the event keyword).

In game development we have so many classes that do very different things. It’s good to keep them as decoupled as possible, but sometimes that is very hard. The observer pattern is a great tool to keep your code decoupled very easily.

Achievement System

Let’s say that we want to implement an achievement system. We can have so many different achievements like “Make 20 consecutive headshots”, “Beat the game under 3 hours”, “Fall from high height without dying”. Unlocking these achievements means that we have to make calls to some methods in many different places in our code. Let’s take for example the “Fall from high height without dying”. As you can guess this achievement is somehow tied to the Physics Engine, but do we really want to see a call to AchievementsManager.Unclock(Achievement.FallFromHighHeightWithoutDying) right in the middle of our collision detection or something? How do we avoid that?

That’s what the observer pattern is for. It lets one piece of code announce that something interesting happened without actually caring who receives the notification.

Imagine that our game world consists of entities. The interface for our entities is something like this:

public interface IEntity
{
    void PhysicsUpdate();

    // Other methods
}

The Physics Engine is responsible to update the physics of all entities in the game world. Our character is also an entity, and his PhysicsUpdate() method may look something like this:

public class Character : IEntity
{
    public virtual void PhysicsUpdate()
    {
        // Apply gravity and stuff...

        if (this.FellFromHighHeightWithoutDying())
        {
            AchievementsManager.Unlock(Achievement.FallFromHighHeightWithoutDying);
        }
    }

    // Other code...
}

We want to get rid of the call that unlocks the achievement through our AchievementsManager, because this way we couple the achievements system with our character. We are going to replace it with a call to another method:

NotifyObservers(this, Event.FallFromHighHeightWithoutDying);

This single line of code just says: “Look, I don’t know if anybody cares, but this entity just fell from high height without dying”. If someone cares however, he knows what to do. That someone is actually the observer. There can also be more than one observer, but let’s not get ahead of ourselves. Now we are decoupled from the AchievementsManager, but where did we actually get the NotifyObservers method from? All I can say is that it’s part of the big picture. Now lets draw that picture.

The Observer

Let’s start with the observer class. All observers observe for something interesting to happen. The interface for all observers is as follows.

public interface IObserver
{
    void OnNotify(IEntity entity, Event ev);
}

In our case the observer is the AchievementsManager.

public class AchievementsManager : IObserver
{
    public void OnNotify(IEntity entity, Event ev)
    {
        switch (ev)
        {
            case Event.FallFromHighHeightWithoutDying:
                bool isEntityCharacter = (entity as Character) != null;
                if (isEntityCharacter)
                {
                    this.UnlockAchievement(Achievement.FallFromHighHeightWithoutDying);
                }

                break;

            // Other cases...
        }
    }

    private void UnlockAchievement(Achievement achievement)
    {
        // Unlock if not already unlocked...
    }
}

The Observable Objects

The observable objects are the objects that are being observed by observers. These objects must also notify the observers if anything interesting happened. Let’s implement the interface for all observable objects. We need to be able to add, remove and notify any observers.

public interface IObservable
{
    void AddObserver(IObserver observer);

    void RemoveObserver(IObserver observer);

    void NotifyObservers(IEntity entity, Event ev);
}

In our case the observable object is our Character.

public class Character : IEntity, IObservable
{
    private List<IObserver> observers;

    // IEntity interface implementation
    public virtual void PhysicsUpdate()
    {
        // Apply gravity and stuff...

        if (this.FellFromHighHeightWithoutDying())
        {
            this.NotifyObservers(this, Event.FallFromHighHeightWithoutDying);
        }
    }
    // END IEntity interface implementation

    // IObservable interface implementation
    public virtual void AddObserver(IObserver observer)
    {
        this.observers.Add(observer);
    }

    public virtual void RemoveObserver(IObserver observer)
    {
        this.observers.Remove(observer);
    }

    public virtual void NotifyObservers(IEntity entity, Event ev)
    {
        foreach (var observer in this.observers)
        {
            observer.OnNotify(entity, ev);
        }
    }
    // END IObservable interface implementation
}

Now you see how it works. Our character is being observed by the achievement system. However, he actually doesn’t know that. He only knows that maybe he is being or is not being observed (sounds spooky :D). Either way, he must notify his observers (if any) when something interesting happens. The good thing is that he actually doesn’t know the true faces of his observers. He only has a list of references to instances of some interface. In this list our AchivementsManager is present, because the manager needs to know when the character falls from high height without dying. There is no problem for the AchievementsManager to know about the existence of our character, the problem is when our character knows about the manager. However, that problem is no more thanks to the observer pattern.

Deleting Observers

If you are using C# for a scripting language, or any language with garbage collection you must be wary of memory leaks. What do I mean? Let’s say for example that we have an observer (UI Screen) that observers some stats of our main character. When the player displays this UI screen, it’s added to the list of observers of the character, so when the stats change the UI screen is notified and updated. Let’s say the player closes this screen. The screen is not visible anymore. However the garbage collector will not delete it. You know why? Because we didn’t remove the observer from the list of observers. Our main character has a reference to the UI screen and the GC will not delete it.

If some observer has done it’s job and is not needed anymore, make sure that not a single observable object has a reference to it. Otherwise the observer won’t be garbage collected.
State Pattern

Why do we need this pattern and when to use it? In order to show you we are first going to see some bad code, and then we are going to rewrite the code with the state pattern.

Bad Code

Imagine that we are working on a third person stealth game, and we need to implement the character and make him respond to user input. He can jump and duck.

public class Character
{
    private bool isGrounded;
    private bool isDucking;
    private bool isJumping;

    public void Update()
    {
        // Update the player depending on the private fields
    }

    public void HandleInput(Input input)
    {
        if (input == Input.PRESS_SPACE)
        {
            if (this.isGrounded && !this.isDucking)
            {
                this.isJumping = true;
                this.isGrounded = false;
            }
        }
        else if (input == Input.PRESS_CTRL)
        {
            if (this.isGrounded)
            {
                this.isDucking = true;
            }
        }
        else if (input == Input.RELEASE_CTRL)
        {
            if (this.isDucking)
            {
                this.isDucking = false;
            }
        }
    }
}

At first glance this code is not written badly. When we press “Space” the character can jump only if he is grounded and not ducking. If we press “Ctrl” the character can duck only if he is grounded, not when he is jumping, and so on, and so on. Now imagine that the character can also swim, or even skydive like in Just Cause. Maybe he can also enter different vehicles (cars, jet planes). For all these states of the character we need different booleans – isSwimming, isSkydiving, isInCar, isInJetPlane. In all of these states the character has different input handling. If he is grounded for example and we press “Space” he will jump, but what if he is swimming, or he is in a car and we press “Space” again. Maybe while swimming  the character will ascent, and while he is in a car he will activate the brakes of the car. Now imagine that the character can do many other things. Soon our HandleInput(Input input) and Update() methods will be a nightmare to extent and maintain. In such cases the use of state machines can save our lives.

Finite State Machines

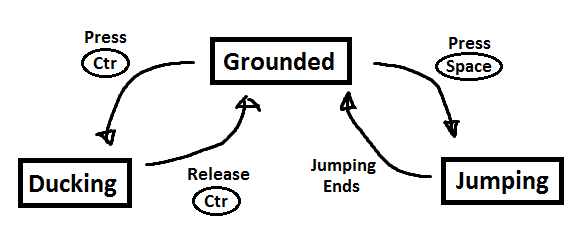
Finite State Machines are very simple. They only sound fancy. We can visualize our current character logic like that

State Machine

  1. The machine has a fixed set of states – Grounded, Ducking and Jumping in our case
  2. Only one state can be active at a time
  3. We can send input to the machine – in our case this is raw input from the user
  4. Each state has a set of transitions – each associated with an input and pointing to another state

Good Code – The State Pattern

Basically, all we need to do is to implement a finite state machine in code. How do we do that? If you are doing it for the first time – it’s hard. It’s actually very easy. Once you see how to do it, you won’t forget it.


Let us first start by implementing an interface for all states. Lets name it ICharacterState

public interface ICharacterState
{
    void OnEnter(Character character);

    void OnExit(Character character);

    void ToState(Character character, ICharacterState targetState);

    void Update(Character character);

    void HandleInput(Character character, Input input);
}

OnEnter and OnExit are very useful, because we can execute some code when the character enters/exits a specific state – play a sound, change the animation of the character, etc. These methods will be called automatically when we make a call to the ToState method. In order to make it automated we need a base abstract class for all of the states. Lets name it CharacterStateBase. But first lets change out Character class like this.

public class Character
{
    private ICharacterState state;

    public ICharacterState State
    {
        get
        {
            return this.state;
        }
        set
        {
            this.state = value;
        }
    }

    public void Update()
    {
        this.State.Update(this);
    }

    public void HandleInput(Input input)
    {
        this.State.HandleInput(this, input);
    }

    // Other code
}

The character has a state. In his Update() method we update his current state. Every state also has a different input handling. In the HandleInput(Input input) method we just make a call to the HandleInput(Character character, Input input) method of the current state.


And now the CharacterStateBase class.

public abstract class CharacterStateBase : ICharacterState
{
    public virtual void OnEnter(Character character) { }

    public virtual void OnExit(Character character) { }

    public virtual void ToState(Character character, ICharacterState targetState)
    {
        character.State.OnExit(character);
        character.State = targetState;
        character.State.OnEnter(character);
    }

    public abstract void Update(Character character);

    public abstract void HandleInput(Character character, Input input);
}

All that is left is to implement the “Grounded”, “Jumping” and “Ducking” states.


public class GroundedCharacterState : CharacterStateBase
{
    // Some code

    public override void HandleInput(Character character, Input input)
    {
        if (input == Input.PRESS_SPACE)
        {
            this.ToState(character, STATE_JUMPING);
        }
        else if (input == Input.PRESS_CTRL)
        {
            this.ToState(character, STATE_DUCKING);
        }

        // More code
    }

    public override void Update(Character character)
    {
        // Some code
    }
}

public class JumpingCharacterState : CharacterStateBase
{
    // Some code

    public override void HandleInput(Character character, Input input)
    {
        // Some code
    }

    public override void Update(Character character)
    {
        if (character.IsGrounded())
        {
            this.ToState(character, STATE_GROUNDED);
        }

        // More code
    }
}

public class DuckingCharacterState : CharacterStateBase
{
    // Some code

    public override void HandleInput(Character character, Input input)
    {
        if (input == Input.RELEASE_CTRL)
        {
            this.ToState(character, STATE_GROUNDED);
        }

        // More code
    }

    public override void Update(Character character)
    {
        // Some code
    }
}

The STATE_GROUNDED, STATE_JUMPING and STATE_DUCKING are just references to instances of GroundedCharacterState, JumpingCharacterState and DuckingCharacterState. You can create them anywhere you want. I personally like to create static readonly instances in the CharacterStateBase class.


I personally love this pattern. It’s very easy to extent the behavior of the character, we just need to create a bunch of different states. Once created we don’t touch them anymore. But as good as it is, there are also problems.

Concurrent State Machines

Lets imagine that the character is running. He is in a running state. But can he run and shoot at the same time? The problem is that only one state can be active at a time. The character can’t run and shoot at the same time, but we want him to be able to do so. One solution is to create a state that combines both the running and the shooting states. That however is not a very good solution. Imagine that the character can shoot while jumping, ducking, walking. Even worse – the character can shoot with different types of weapons (pistols, rifles, grenade launchers). The input handling for these weapons is a little different from one another. If we are to create that many combined states, we will end up overkilling the architecture of our code. A better solution is to create a secondary state, that can be updated separately from the main state. The character class will look like this.

public class Character
{
    private ICharacterState state;
    private ICharacterState equipmentState;

    public void Update()
    {
        this.State.Update(this);
        this.EquipmentState.Update(this);
    }

    public void HandleInput(Input input)
    {
        this.State.HandleInput(this, input);
        this.EquipmentState.HandleInput(this, input);
    }

    // Other code
}

When to Use

There is not a strict rule when to use it. This applies to all patterns in general. You need to ask yourself three questions:

  • Do you have an entity whose behavior changes based on some internal state?
  • Can that state be rigidly divided into one of a relatively small number of distinct options?
  • Does the entity respond to a series of inputs or events over time?

If the answer to all questions is a “YES” then you might consider using this pattern.

I’ve used it for simple AI behaviors. You can actually check this Video Tutorial from Unity Technologies. A guy shows how to implement a basic state machine for AI. However if you want to create a more complex AI, I advise you to use Behavior Trees. I’ve actually never used them myself, but I know that they are the right way to do more advanced AI.

I’ve also used the state pattern when I was implementing the UI in the main menu of a certain game. I had a bunch of screens and you can go from one screen to another, based on some user input. Each state is a different UI Screen. Based on the user input I just make transitions between the screens.