How to use Native Code in Unity

You can use native code in Unity by importing Native Plugins.
Native Plugins are basically libraries of native code written in C/C++. You can import them in C# and make function calls to native code. This way you can gain performance, or use them for whatever reasons you have. I want to note that this isn’t Unity specific thing, I am just using Unity as an example.

How To Create a Native Library

I am working with Visual Studio, so I will show you how to do it in Visual Studio.

You need to create a C++ Dynamic-Link Library (DLL) project. After you write your native code there, you need to build the project and a .dll will be generated. Later you will need to import this .dll in Unity.

Let’s write a simple function so that I can show you how to import it in Unity.

#define DllExport __declspec(dllexport)

extern "C" {
	DllExport float GetFloat() { return 1.0f; }
}

How To Import It In Unity

First you have to place the .dll somewhere in the Assets folder. You can create a sub-folder specifically fot the native libraries if you want, it doesn’t matter. Let’s say the name of the library is MyLib.dll. This is how you import it.

public class TestBehaviour : MonoBehaviour
{
    [DllImport("MyLib")]
    private static extern float GetFloat();

    private void Awake()
    {
        Debug.Log(GetFloat());
    }
}

How To Import a Class

Lets say you don’t want to import static functions, but an entire class with instance methods instead.

The concept of “instance” method is actually just some sugar that the compiler/framework provides. Actually all methods are static. Instance methods just have an additional hidden parameter “this” that is a reference to the object instance.
If you want to call a native method for a certain native object, you would need to pass the native object reference along to the method call. Usually, you would create a wrapper class in .NET/C# that holds that native pointer (IntPtr) and provides the required methods for the C# environment. Those calls are then forwarded to the native interface. You just have to pass the object along.

Here is an example

// Header
class Person
{
public:
	Person(const char* name);
	~Person();

	const char* GetName() const;

private:
	char* _name;
};

// Source
Person::Person(const char* name)
{
	size_t nameLength = strlen(name);
	_name = new char[nameLength + 1];

	for (int i = 0; i < nameLength; i++)
	{
		_name[i] = name[i];
	}

	_name[nameLength] = '\0';
}

Person::~Person()
{
	delete _name;
	_name = nullptr;
}

const char* Person::GetName() const
{
	return _name;
}

// Export Interface
extern "C" {
	DllExport Person* CreatePerson(const char* name)
	{
		return new Person(name);
	}

	DllExport void DestroyPerson(Person* person)
	{
		delete person;
	}

	DllExport const char* GetPersonName(Person* person)
	{
		return person->GetName();
	}
}

// C# Wrapper Class
public class Person
{
    private IntPtr _personPtr = IntPtr.Zero;

    public Person(string name)
    {
        IntPtr namePtr = Marshal.StringToHGlobalAnsi(name);
        _personPtr = CreatePerson(namePtr);
        Marshal.FreeHGlobal(namePtr);
    }

    ~Person()
    {
        if (_personPtr != IntPtr.Zero)
        {
            DestroyPerson(_personPtr);
            _personPtr = IntPtr.Zero;
        }
    }

    public string GetName()
    {
        IntPtr namePtr = GetPersonName(_personPtr);
        string name = Marshal.PtrToStringAnsi(namePtr);

        return name;
    }

    [DllImport("MyLib")]
    private static extern IntPtr CreatePerson(IntPtr name);

    [DllImport("MyLib")]
    private static extern void DestroyPerson(IntPtr person);

    [DllImport("MyLib")]
    private static extern IntPtr GetPersonName(IntPtr person);
}

How To Create A Fancy Portal Effect In Unity

Expectations

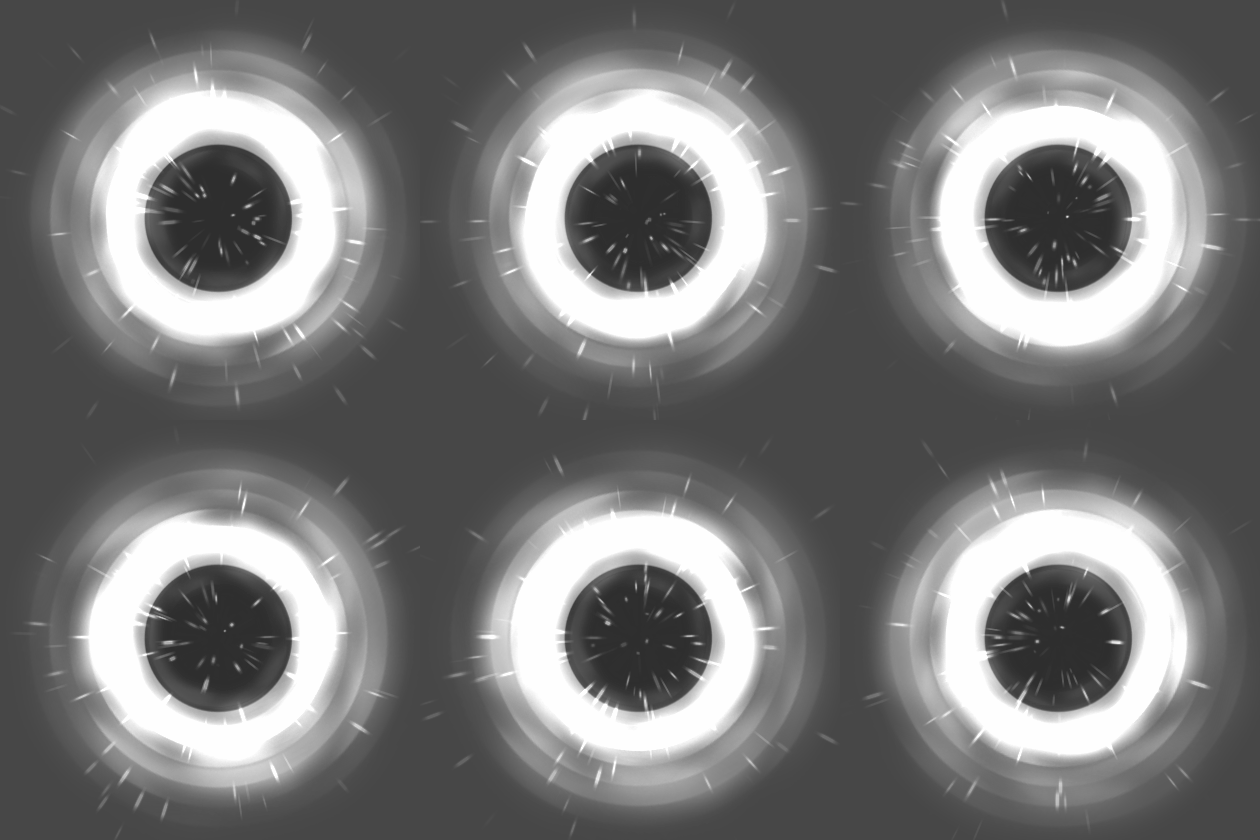
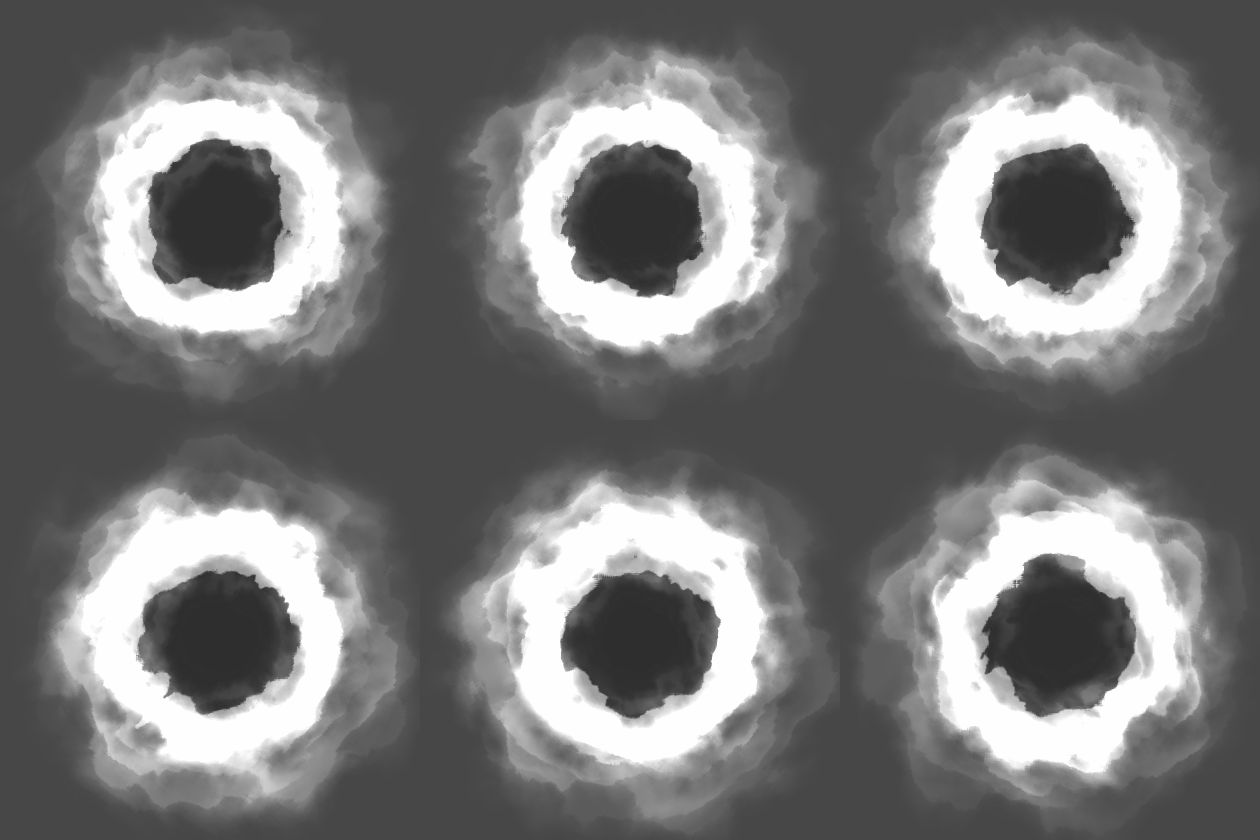
Recently I created a portal particle system in Unity for a game that I am developing. I am really pleased with the result and I want to share with you how to create one yourselves. Here is the final effect that we will be making today.

What do we need

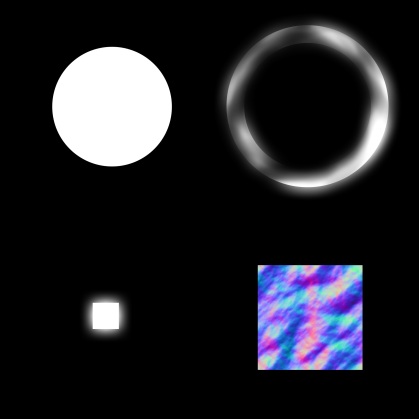
We need four textures

T_Portalbackground
T_PortalCircle
T_PortalDust
T_PortalNoise

With the first 3 we are going to create the particle system itself, which consists of 5 sub-particle systems. With the noise texture (the one with RGB colors) we are going to distort each sub-system to achieve the final result.

We are also going to need 2 custom shaders – Additive and Multiplicative Particle Distortion Shaders. They are very cheap and optimized especially for mobile devices. The game I am working on is a mobile game after all.

Here is the Additive Shader

Shader "Custom/Mobile/Particles/Additive Distortion" {
	Properties{
		_MainTex("Main Texture", 2D) = "white" {}
		_NoiseTex("Noise Texture", 2D) = "white" {}
		_IntensityAndScrolling("Intensity (XY), Scrolling (ZW)", Vector) = (0.1,0.1,0.1,0.1)
	}
	SubShader{
		Tags {
			"IgnoreProjector" = "True"
			"Queue" = "Transparent"
			"RenderType" = "Transparent"
		}
		Pass {
			Blend One One
			ZWrite Off

			CGPROGRAM
			#pragma vertex vert
			#pragma fragment frag

			#include "UnityCG.cginc"

			uniform sampler2D _MainTex;
			uniform sampler2D _NoiseTex;
			uniform float4 _MainTex_ST;
			uniform float4 _NoiseTex_ST;
			uniform float4 _IntensityAndScrolling;

			struct VertexInput {
				float4 vertex : POSITION;
				float2 texcoord0 : TEXCOORD0;
				float2 texcoord1 : TEXCOORD1;
				float4 vertexColor : COLOR;
			};

			struct VertexOutput {
				float4 pos : SV_POSITION;
				float2 uv0 : TEXCOORD0;
				float2 uv1 : TEXCOORD1;
				float4 vertexColor : COLOR;
			};

			VertexOutput vert(VertexInput v) {
				VertexOutput o;
				o.uv0 = TRANSFORM_TEX(v.texcoord0, _MainTex);
				o.uv1 = TRANSFORM_TEX(v.texcoord1, _NoiseTex);
				o.uv1 += _Time.yy * _IntensityAndScrolling.zw;
				o.vertexColor = v.vertexColor;
				o.pos = mul(UNITY_MATRIX_MVP, v.vertex);

				return o;
			}

			float4 frag(VertexOutput i) : COLOR {
				float4 noiseTex = tex2D(_NoiseTex, i.uv1);
				float2 offset = (noiseTex.rg * 2 - 1) * _IntensityAndScrolling.rg;
				float2 uvNoise = i.uv0 + offset;
				float4 mainTex = tex2D(_MainTex, uvNoise);
				float3 emissive = (mainTex.rgb * i.vertexColor.rgb) * (mainTex.a * i.vertexColor.a);

				return fixed4(emissive, 1);
			}
			ENDCG
		}
	}
	FallBack "Mobile/Particles/Additive"
}

And the Multiplicative Shader

Shader "Custom/Mobile/Particles/Multiply Distortion" {
	Properties{
		_MainTex("Main Texture", 2D) = "white" {}
		_NoiseTex("Noise Texture", 2D) = "white" {}
		_IntensityAndScrolling("Intensity (XY), Scrolling (ZW)", Vector) = (0.1,0.1,0.1,0.1)
	}
	SubShader{
		Tags {
			"IgnoreProjector" = "True"
			"Queue" = "Transparent"
			"RenderType" = "Transparent"
		}
		Pass {
			Blend DstColor Zero
			ZWrite Off

			CGPROGRAM
			#pragma vertex vert
			#pragma fragment frag

			#include "UnityCG.cginc"

			uniform sampler2D _MainTex;
			uniform sampler2D _NoiseTex;
			uniform float4 _MainTex_ST;
			uniform float4 _NoiseTex_ST;
			uniform float4 _IntensityAndScrolling;

			struct VertexInput {
				float4 vertex : POSITION;
				float2 texcoord0 : TEXCOORD0;
				float2 texcoord1 : TEXCOORD1;
				float4 vertexColor : COLOR;
			};

			struct VertexOutput {
				float4 pos : SV_POSITION;
				float2 uv0 : TEXCOORD0;
				float2 uv1 : TEXCOORD1;
				float4 vertexColor : COLOR;
			};

			VertexOutput vert(VertexInput v) {
				VertexOutput o;
				o.uv0 = TRANSFORM_TEX(v.texcoord0, _MainTex);
				o.uv1 = TRANSFORM_TEX(v.texcoord1, _NoiseTex);
				o.uv1 += _Time.yy * _IntensityAndScrolling.zw;
				o.vertexColor = v.vertexColor;
				o.pos = mul(UNITY_MATRIX_MVP, v.vertex);

				return o;
			}

			float4 frag(VertexOutput i) : COLOR {
				float4 noiseTex = tex2D(_NoiseTex, i.uv1);
				float2 offset = (noiseTex.rg * 2 - 1) * _IntensityAndScrolling.rg;
				float2 uvNoise = i.uv0 + offset;
				float4 mainTex = tex2D(_MainTex, uvNoise);
				float3 emissive = lerp(float3(1,1,1), mainTex.rgb * i.vertexColor.rgb, mainTex.a * i.vertexColor.a);

				return fixed4(emissive, 1);
			}
			ENDCG
		}
	}
	FallBack "Mobile/Particles/Multiply"
}

As you can see, they are almost exactly the same. The difference is only in the blending and the calculation of the emissive color in the fragment function.

Step By Step

First we are going to make the particle system with the built-in mobile additive and multiplicative shaders, and then we are going to add distortion with our custom shaders. I want to do this, so you can see how big the difference is.

Background

Using an additive shader we start by emitting a single particle with the first texture. The exact color is “FFFFFF4B“. It should look like this.

Nice start huh?

Black Hole

Yeah, you hear right. We are going to create a black hole.
By using a multiplicative shader we are going to emit a single smaller black circle over the white one. The exact color is “000000AF“. Something like this.

Rotating Frame

Next using an additive shader and the second texture we emit 3 circles – each with different start rotation and angular velocity. The exact color is “FFFFFF80“”. It looks like this.

Pulsing Circles

Again using an additive shader and the second texture we start emitting pulsing circles from the center towards the frame. Each circle has different start rotation and no angular velocity. The rate is 3 particles per 2 seconds. Again the color of each circle is “FFFFFF80“.

Small Sucked Particles

Using an additive shader and the third texture we add small particles that are sucked into the portal. Again the color is “FFFFFF80“.

Adding Distortion

The only thing that’s left is adding distortion to each sub-particle system with our custom additive and multiplicative shaders and the noise texture. The only thing we don’t distort are the sucked particles.

Bezier Curves

Bezier Curves are very useful and have many applications, but what do we need to know to implement one ourselves? Well, you can keep reading, or you can just download the unity package that I made.

Lerp (Linear Interpolation)

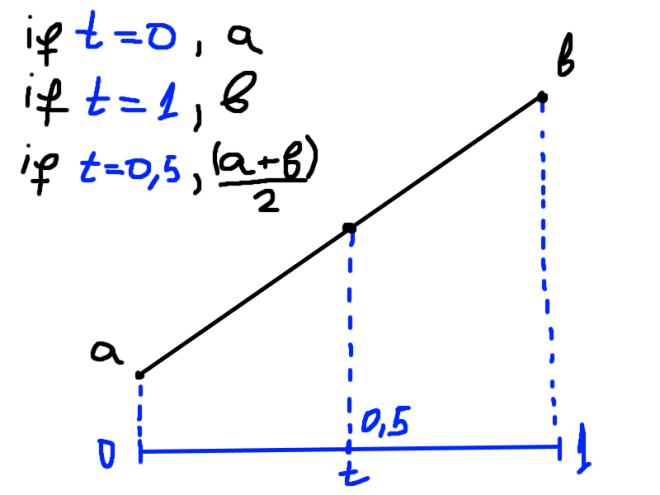
Before we start we need to know what Lerp is. If you want to understand it more mathematically you can check the description in wikipedia. It’s very simple. Lerp is a function which takes three parameters – a, b and t, where a is start value, b is end value, and t is time (between 0 and 1). The function is defined like this

Lerp

In code it looks like this

float Lerp(float a, float b, float t)
{
    return (1f - t) * a + t * b;
}

Note that we can use the same logic if we want to lerp vectors

Vector3 Lerp(Vector3 a, Vector3 b, float t)
{
    return (1f - t) * a + t * b;
}

Bezier Curves

Now that we know what lerp is we can start.
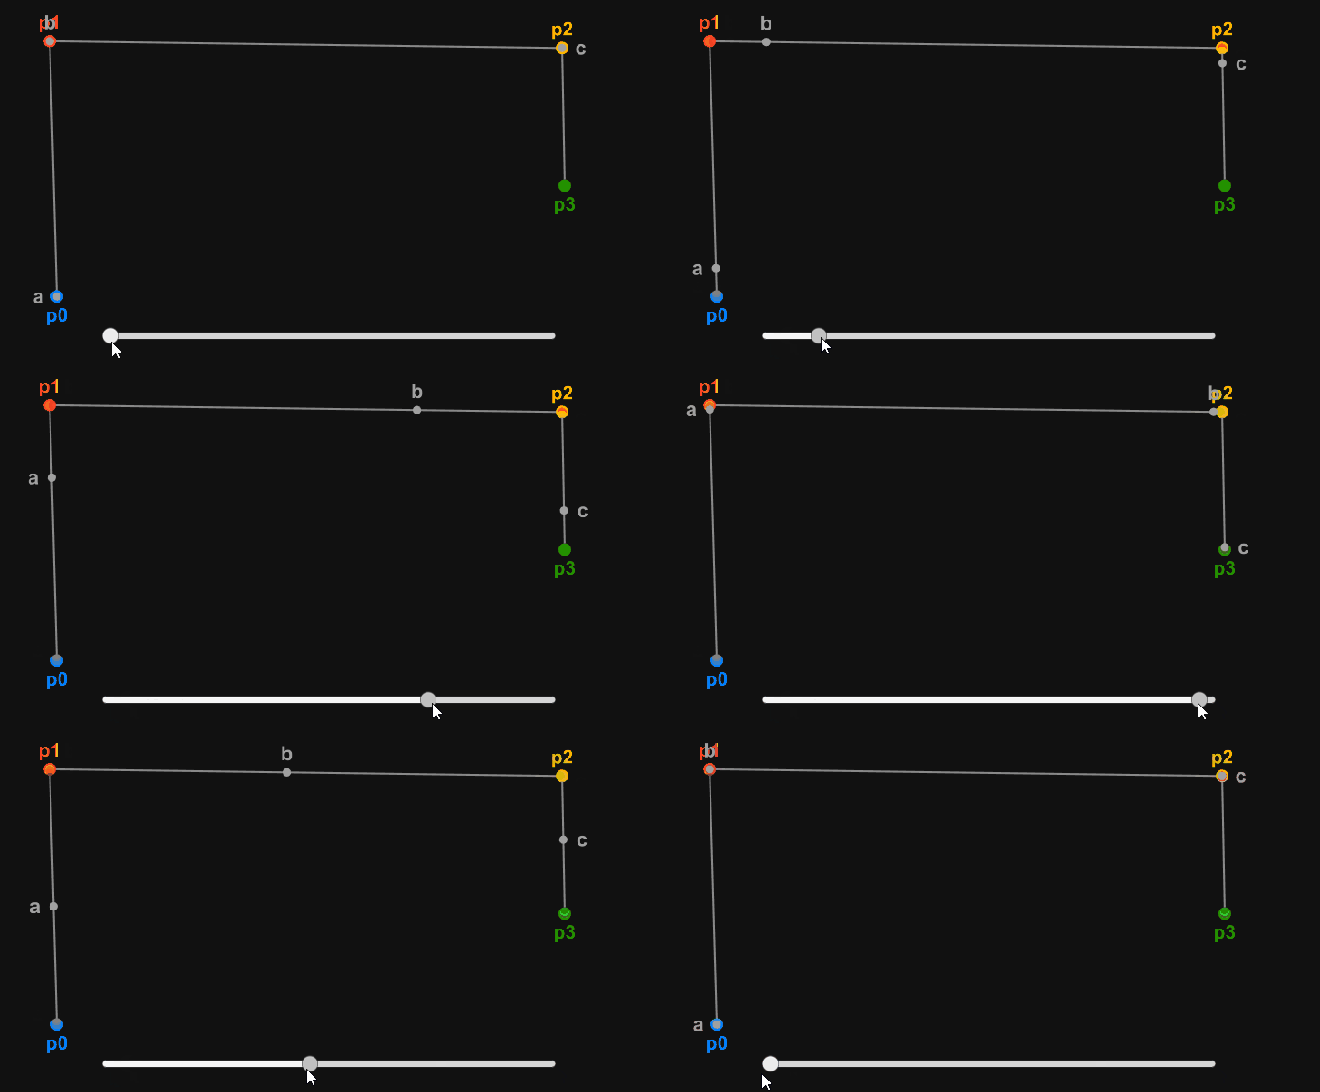
A bezier curve is also defined by a function, but a function of higher degree (cubic to be precise). For a cubic curve we need 4 points (control points). These 4 points control the shape of the curve. Lets call the points p0, p1, p2 and p3. p0 is called start point, p1start tangent, p2end tangent, and p3end point. Lets imagine that the points are positioned like this:

Control Points

The slider at the bottom represents the t value.
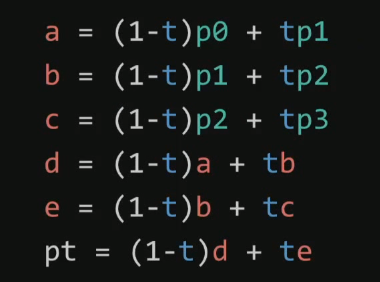
In order to construct the function we are going to go through some steps. In each step we are going to make some lerps, and at the end we will combine these lerps.

Step One

We are going to make 3 lerps – between p0 and p1, between p1 and p2, and between p2 and p3.

Vector3 a = Lerp(p0, p1, t);
Vector3 b = Lerp(p1, p2, t);
Vector3 c = Lerp(p2, p3, t);

It looks like this

Lerp One

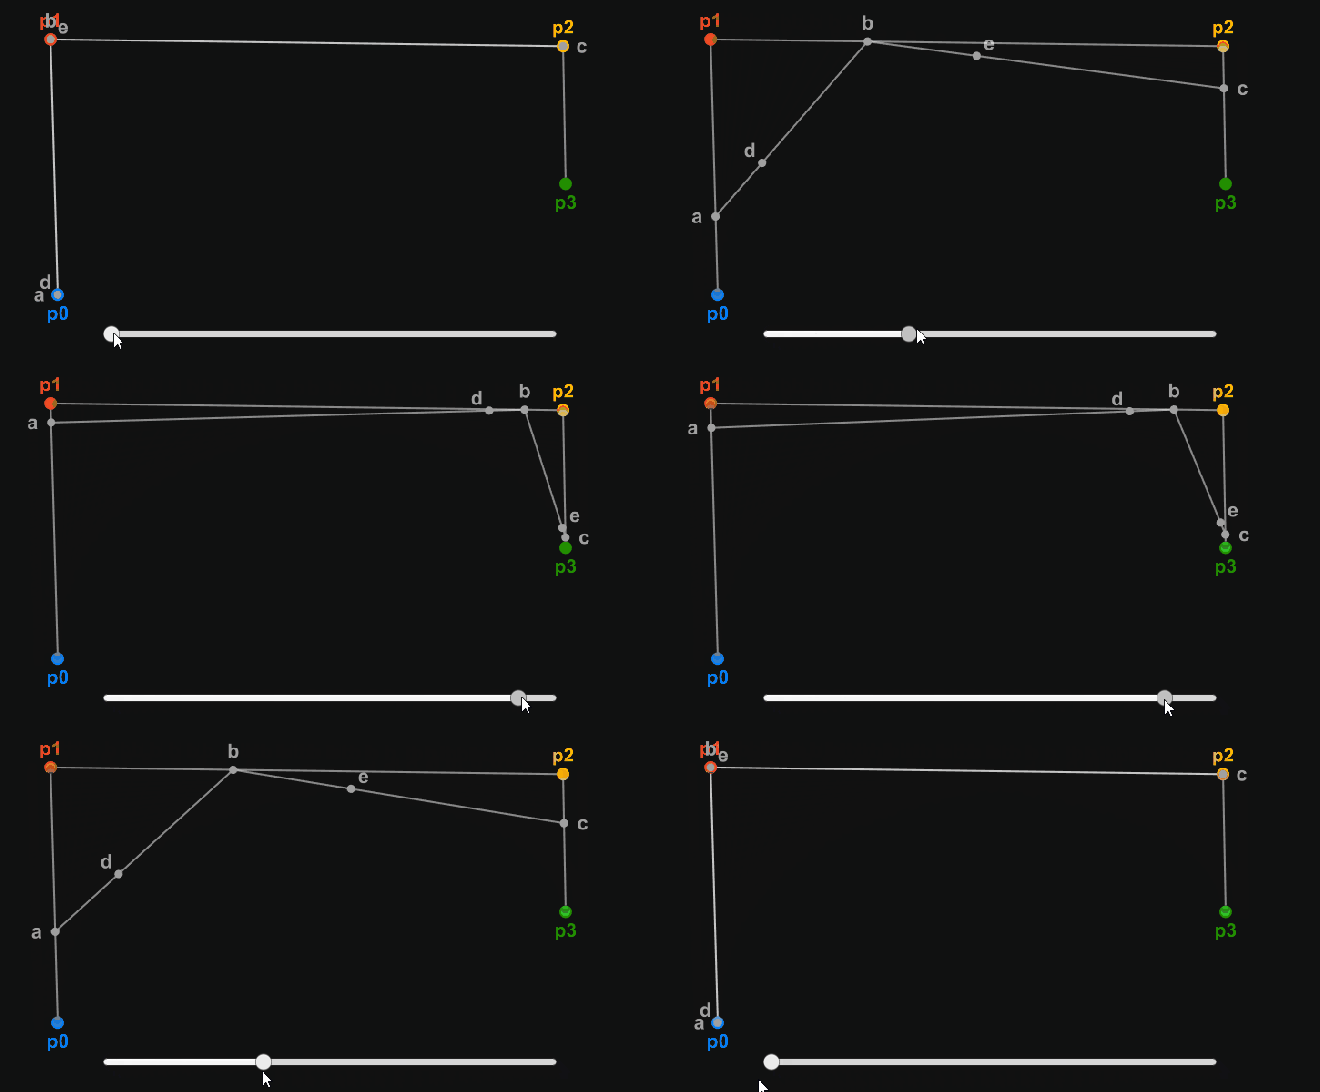
Now lets draw lines between a and b, and between b and c

Lerp One Plus Lines

Step Two

Again we are going to make some lerps – this time between a and b, and between b and c

Vector3 d = Lerp(a, b, t);
Vector3 e = Lerp(b, c, t);

Lerp Two

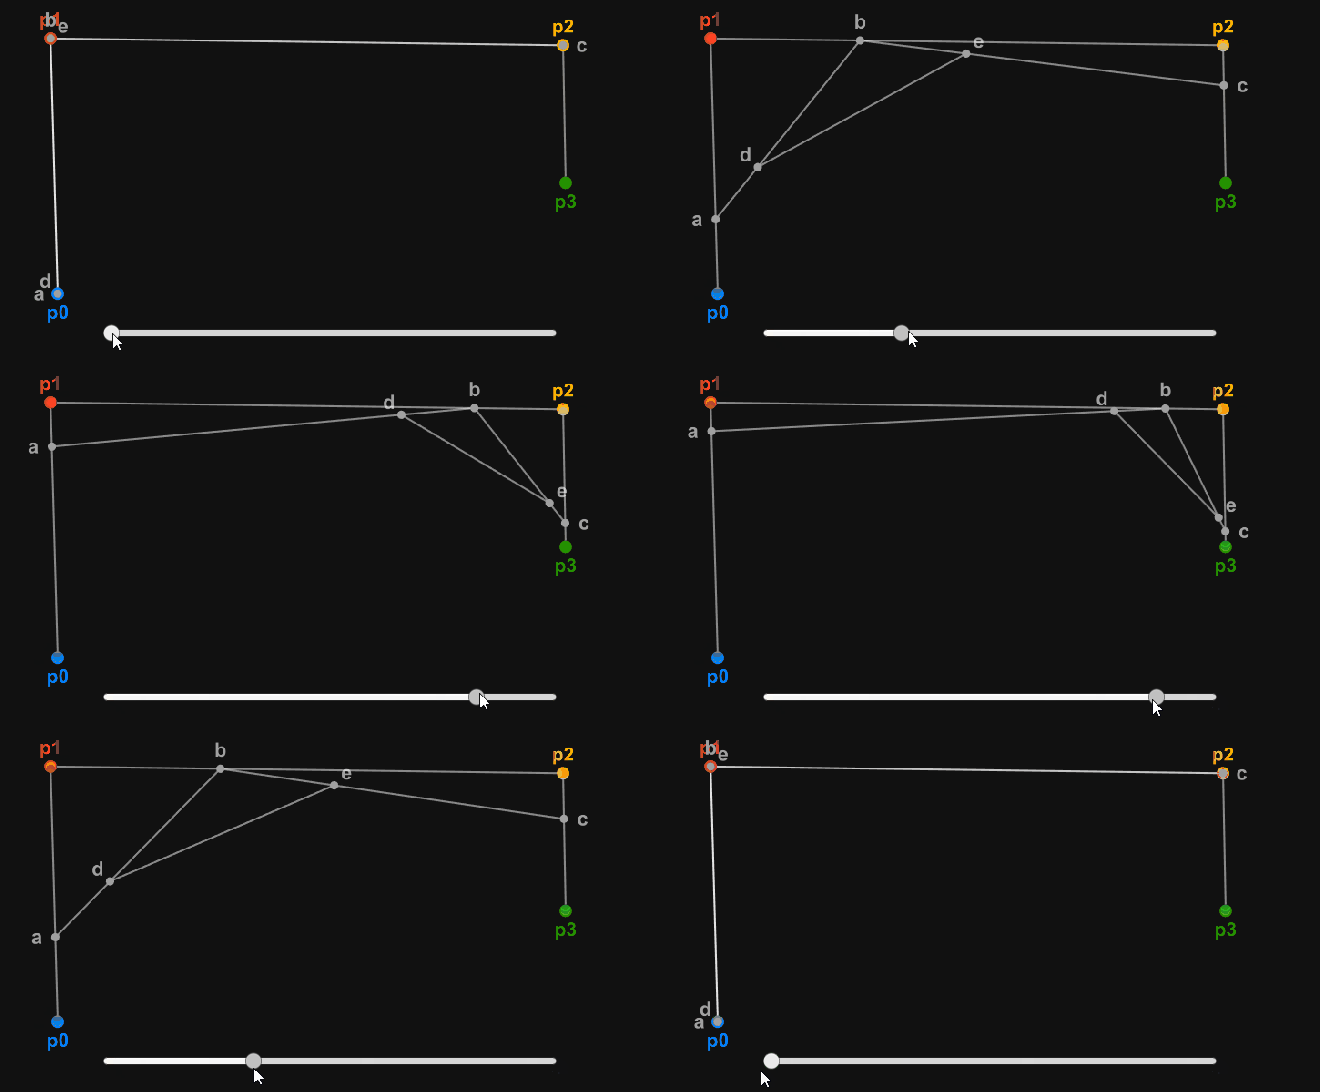
Now lets draw a line between d and e

Lerp Two Plus Lines

Step Three

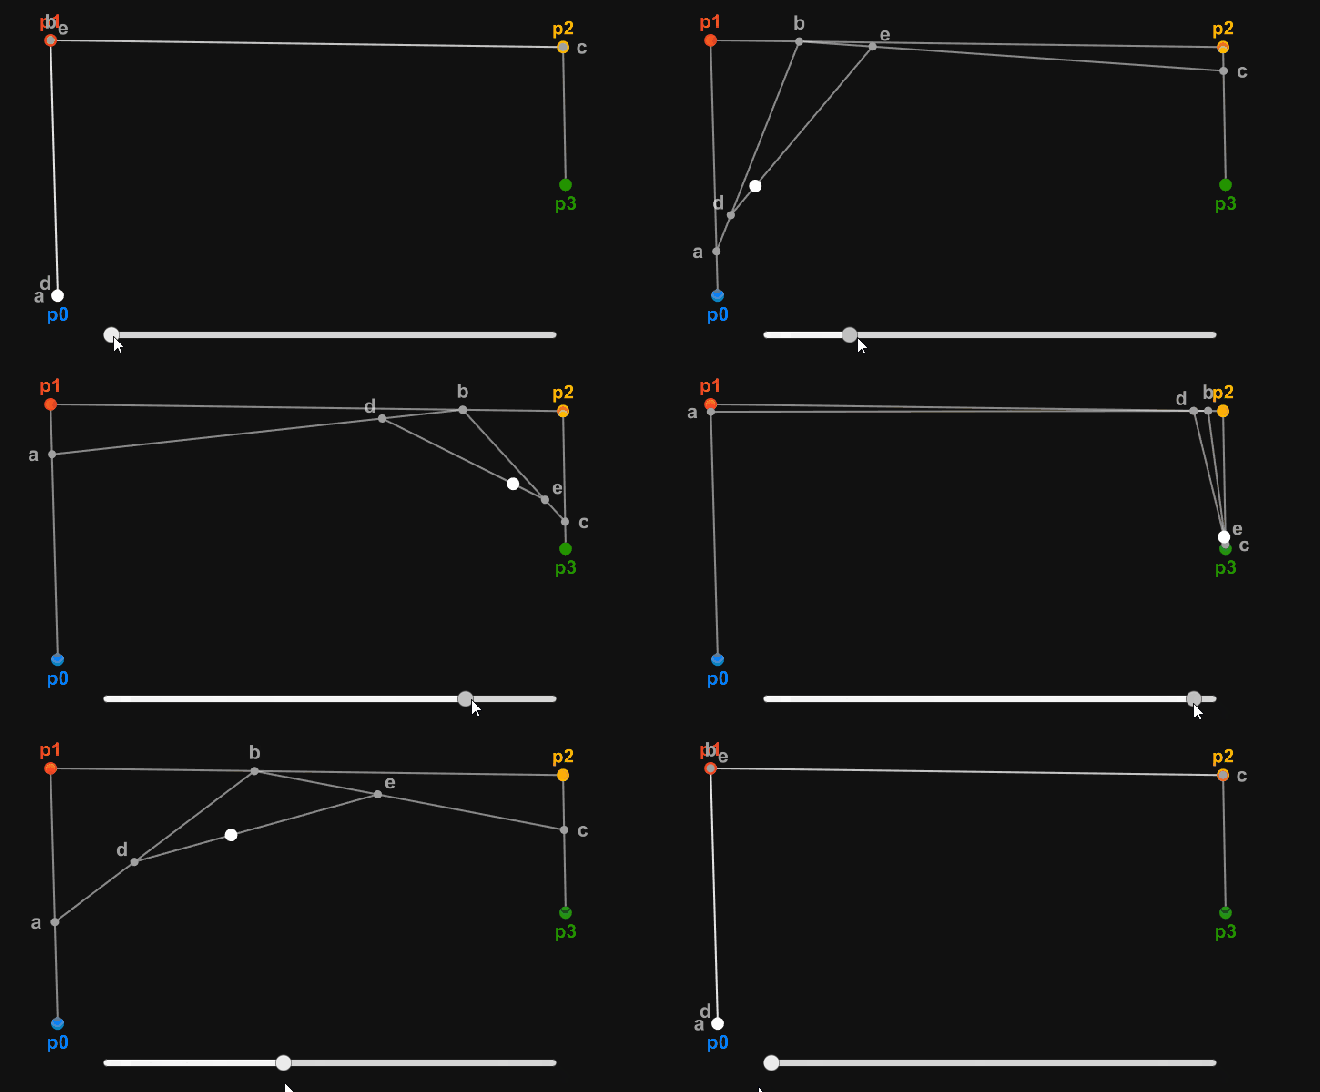
Now all we need to do is to make one last lerp between d and e, so we can find the point on the curve at any given time t.

Vector3 pointOnCurve = Lerp(d, e, t);

Lets draw the point

Lerp Three

And now let’s draw the bezier curve

Draw Curve

The Function

Now if we combine all these lerps, we get the final function that defines any bezier curve by 4 points and a t value

Vector3 GetPointOnBezierCurve(Vector3 p0, Vector3 p1, Vector3 p2, Vector3 p3, float t)
{
    Vector3 a = Lerp(p0, p1, t);
    Vector3 b = Lerp(p1, p2, t);
    Vector3 c = Lerp(p2, p3, t);
    Vector3 d = Lerp(a, b, t);
    Vector3 e = Lerp(b, c, t);
    Vector3 pointOnCurve = Lerp(d, e, t);

    return pointOnCurve;
}

However this function is not very cheap. With a little math we can simplify the function and thus improve the performance.

Optimizations

Mathematically the function looks like this

Point On Curve

With a little calculations on paper we can simplify it to this

Optimized

So the final function in code can be written like this

Vector3 GetPointOnBezierCurve(Vector3 p0, Vector3 p1, Vector3 p2, Vector3 p3, float t)
{
    float u = 1f - t;
    float t2 = t * t;
    float u2 = u * u;
    float u3 = u2 * u;
    float t3 = t2 * t;

    Vector3 result =
        (u3) * p0 +
        (3f * u2 * t) * p1 +
        (3f * u * t2) * p2 +
        (t3) * p3;

    return result;
}

Bezier Splines (Bezier Paths)

What if we want to create a more complex curve?
There are two options:

  • Use a higher degree function
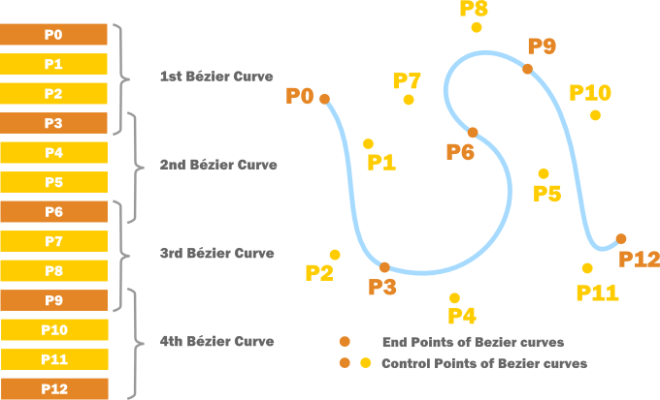
  • Combine (chain) cubic bezier curves

The first option is not very good, because every time we increase the degree of the function, we create more job for the CPU (we increase the number of calculations).
The second one is more widely used, and it can be explained like this:

Bezier Spline

p3 is the end of the first bezier curve and the start of the second one, and so on.

Abstract Input System in Unity

Right now I am creating a game. For this game I wanted to create a good input system. The thing is I didn’t know where to start. I am a big fan of Ori and the Blind Forest, so I decided to decompile the game and see how the big guys did it. As expected, their code was huge, but I took only the parts for my needs.

Interfaces

There are 2 basic interfaces for taking raw input: IAxisInput and IButtonInput.

public interface IAxisInput
{
    float GetAxis();
}

public interface IButtonInput
{
    bool GetButton(); // When the button is held down
    bool GetButtonDown(); // Executed once on button down
    bool GetButtonUp(); // Executed once on button up
}

For the next interface you need to know exactly what the character can do. In my case the character can only move horizontally and jump, so the interface looks like this.

public interface IInputProvider
{
    IAxisInput HorizontalAxisInput { get; }
    IButtonInput JumpButtonInput { get; }
}

This interface provides us with input from different sources. For example, we can create a KeyboardAndMouseInputProvider, or a MobileInputProvider. Lets actually implement those two.

KeyboardAndMouseInputProvider

public class KeyboardAndMouseInputProvider : IInputProvider
{
    private IAxisInput horizontalAxisInput;
    private IButtonInput jumpButtonInput;

    public KeyboardAndMouseInputProvider()
    {
        this.horizontalAxisInput = new CHorizontalAxisInput();
        this.jumpButtonInput = new CJumpButtonInput();
    }

    public virtual IAxisInput HorizontalAxisInput
    {
        get
        {
            return this.horizontalAxisInput;
        }
    }

    public virtual IButtonInput JumpButtonInput
    {
        get
        {
            return this.jumpButtonInput;
        }
    }

    private class CHorizontalAxisInput : IAxisInput
    {
        public float GetAxis()
        {
            return Input.GetAxis("Horizontal");
        }
    }

    private class CJumpButtonInput : IButtonInput
    {
        public bool GetButton()
        {
            return Input.GetButton("Jump");
        }

        public bool GetButtonDown()
        {
            return Input.GetButtonDown("Jump");
        }

        public bool GetButtonUp()
        {
            return Input.GetButtonUp("Jump");
        }
    }
}

MobileInputProvider

public class MobileInputProvider : MonoBehaviour, IInputProvider
{
    [SerializeField]
    private VirtualJoystick leftJoystick = null;

    private IAxisInput horizontalAxisInput;
    private IButtonInput jumpButtonInput;

    public virtual IAxisInput HorizontalAxisInput
    {
        get
        {
            return this.horizontalAxisInput;
        }
    }

    public virtual IButtonInput JumpButtonInput
    {
        get
        {
            return this.jumpButtonInput;
        }
    }

    public void Init()
    {
        this.horizontalAxisInput = new CHorizontalAxisInput(this.leftJoystick);
        this.jumpButtonInput = new CJumpButtonInput();
    }

    private class CHorizontalAxisInput : IAxisInput
    {
        private VirtualJoystick leftJoystick;

        public CHorizontalAxisInput(VirtualJoystick leftJoystick)
        {
            this.leftJoystick = leftJoystick;
        }

        public float GetAxis()
        {
            return this.leftJoystick.GetAxes().x;
        }
    }

    private class CJumpButtonInput : IButtonInput
    {
        private int lastJumpTouchId;

        public bool GetButton()
        {
            if (Input.touchCount > 0)
            {
                foreach (var touch in Input.touches)
                {
                    if ((touch.phase == TouchPhase.Stationary || touch.phase == TouchPhase.Moved) &&
                        (touch.position.x > Screen.width / 2f) &&
                        (touch.fingerId == this.lastJumpTouchId))
                    {
                        return true;
                    }
                }
            }

            return false;
        }

        public bool GetButtonDown()
        {
            if (Input.touchCount > 0)
            {
                foreach (var touch in Input.touches)
                {
                    if (touch.phase == TouchPhase.Began &&
                        touch.position.x > Screen.width / 2f)
                    {
                        this.lastJumpTouchId = touch.fingerId;
                        return true;
                    }
                }
            }

            return false;
        }

        public bool GetButtonUp()
        {
            if (Input.touchCount > 0)
            {
                foreach (var touch in Input.touches)
                {
                    if (touch.phase == TouchPhase.Ended &&
                        touch.position.x > Screen.width / 2f &&
                        touch.fingerId == this.lastJumpTouchId)
                    {
                        return true;
                    }
                }
            }

            return false;
        }
    }
}

Another layer of abstraction

In Unity if we want to get an axis we just do it like this.

float horizontalAxis = Input.GetAxis("Horizontal");

But we can’t get the the horizontal axis like that if we are on a mobile device. We have a MobileInputProvider, we just need a class that uses it.

public static class PlayerInput
{
    public static IInputProvider InputProvider { get; set; }

    public static IAxisInput HorizontalAxisInput
    {
        get
        {
            return InputProvider.HorizontalAxisInput;
        }
    }

    public static IButtonInput JumpButtonInput
    {
        get
        {
            return InputProvider.JumpButtonInput;
        }
    }
}

 
Now we can get the horizontal axis from a mobile device like this.

PlayerInput.InputProvider = mobileInputProvider;
float horizontalAxis = PlayerInput.HorizontalAxisInput.GetAxis();

Compound Input Provider

But what if we want to be able to get input both from a keyboard and from a mobile device. Well we need a provider that gets input from both, but that will be kinda stupid, because we have them in separate, why create a third provider that is copy-paste from the first two? We just need to think of a smart way to combine both input providers. That is how we do it.
 
First we create an axis input that can get axes from many sources. We will call this one CompoundAxisInput. Here is the implementation.

public class CompoundAxisInput : IAxisInput
{
    private const float AXIS_DEAD_ZONE = 0.2f;

    private IAxisInput[] axisInputs;
    private int lastPressedIndex;

    public CompoundAxisInput() { }

    public CompoundAxisInput(params IAxisInput[] axisInputs)
    {
        this.axisInputs = axisInputs;
    }

    public virtual float GetAxis()
    {
        float positiveAxis = 0f;
        float negativeAxis = 0f;
        if (this.axisInputs != null)
        {
            for (int i = 0; i < this.axisInputs.Length; i++)
            {
                float value = this.axisInputs[i].GetAxis();
                if (Mathf.Abs(value) > AXIS_DEAD_ZONE)
                {
                    this.lastPressedIndex = i;
                }
                else
                {
                    continue;
                }

                if (value < 0f)
                {
                    negativeAxis = Mathf.Min(negativeAxis, value);
                }
                else
                {
                    positiveAxis = Mathf.Max(positiveAxis, value);
                }
            }
        }

        return positiveAxis + negativeAxis;
    }

    public IAxisInput GetLastPressed()
    {
        return this.axisInputs[this.lastPressedIndex];
    }

    public void AddAxisInput(IAxisInput axisInput)
    {
        if (this.axisInputs == null)
        {
            this.axisInputs = new IAxisInput[1];
            this.axisInputs[0] = axisInput;
        }
        else
        {
            Array.Resize(ref this.axisInputs, this.axisInputs.Length + 1);
            this.axisInputs[this.axisInputs.Length - 1] = axisInput;
        }
    }

    public void ClearAxisInputs()
    {
        this.axisInputs = null;
    }
}

It’s an axis input that internally has an array of axis inputs. When we call the GetAxis() method, we find the most negative one and most positive one from all of the axis inputs and return the sum of them. That way if we press left on a keyboard and right on a joystick for example, the character will stay in one place, because the horizontal axis will be zero.


Now we have to do the same for the button input. Lets call the class CompoundButtonInput.

public class CompoundButtonInput : IButtonInput
{
    private IButtonInput[] buttonInputs;
    private int lastPressedIndex;

    public CompoundButtonInput() { }

    public CompoundButtonInput(params IButtonInput[] buttonInputs)
    {
        this.buttonInputs = buttonInputs;
    }

    public virtual bool GetButton()
    {
        if (this.buttonInputs != null)
        {
            for (int i = 0; i < this.buttonInputs.Length; i++)
            {
                if (this.buttonInputs[i].GetButton())
                {
                    this.lastPressedIndex = i;
                    return true;
                }
            }
        }

        return false;
    }

    public virtual bool GetButtonDown()
    {
        if (this.buttonInputs != null)
        {
            for (int i = 0; i < this.buttonInputs.Length; i++)
            {
                if (this.buttonInputs[i].GetButtonDown())
                {
                    this.lastPressedIndex = i;
                    return true;
                }
            }
        }

        return false;
    }

    public virtual bool GetButtonUp()
    {
        if (this.buttonInputs != null)
        {
            for (int i = 0; i < this.buttonInputs.Length; i++)
            {
                if (this.buttonInputs[i].GetButtonUp())
                {
                    this.lastPressedIndex = i;
                    return true;
                }
            }
        }

        return false;
    }

    public IButtonInput GetLastPressed()
    {
        return this.buttonInputs[this.lastPressedIndex];
    }

    public void AddButtonInput(IButtonInput buttonInput)
    {
        if (this.buttonInputs == null)
        {
            this.buttonInputs = new IButtonInput[1];
            this.buttonInputs[0] = buttonInput;
        }
        else
        {
            Array.Resize(ref this.buttonInputs, this.buttonInputs.Length + 1);
            this.buttonInputs[this.buttonInputs.Length - 1] = buttonInput;
        }
    }

    public void ClearButtonInputs()
    {
        this.buttonInputs = null;
    }
}

Finally we create a CompoundInputProvider

public class CompoundInputProvider : IInputProvider
{
    private IInputProvider[] inputProviders;
    private CompoundAxisInput horizontalAxisInput;
    private CompoundButtonInput jumpButtonInput;

    public CompoundInputProvider()
        : this(null)
    { }

    public CompoundInputProvider(params IInputProvider[] inputProviders)
    {
        this.horizontalAxisInput = new CompoundAxisInput();
        this.jumpButtonInput = new CompoundButtonInput();

        if (inputProviders != null)
        {
            for (int i = 0; i < inputProviders.Length; i++)
            {
                this.AddInputProvider(inputProviders[i]);
            }
        }
    }

    public virtual IAxisInput HorizontalAxisInput
    {
        get
        {
            return this.horizontalAxisInput;
        }
    }

    public virtual IButtonInput JumpButtonInput
    {
        get
        {
            return this.jumpButtonInput;
        }
    }

    public void AddInputProvider(IInputProvider inputProvider)
    {
        if (this.inputProviders == null)
        {
            this.inputProviders = new IInputProvider[1];
            this.inputProviders[0] = inputProvider;
        }
        else
        {
            Array.Resize(ref this.inputProviders, this.inputProviders.Length + 1);
            this.inputProviders[this.inputProviders.Length - 1] = inputProvider;
        }

        this.horizontalAxisInput.AddAxisInput(inputProvider.HorizontalAxisInput);
        this.jumpButtonInput.AddButtonInput(inputProvider.JumpButtonInput);
    }

    public void ClearInputProviders()
    {
        this.inputProviders = null;
        this.horizontalAxisInput.ClearAxisInputs();
        this.jumpButtonInput.ClearButtonInputs();
    }
}

All that’s left is to provide our PlayerInput class with the right CompoundInputProvider. I do this in an InputManager script.

public class InputManager : MonoBehaviour
{
    [SerializeField]
    private MobileInputProvider mobileInputProvider = null;

    protected virtual void Awake()
    {
        this.InitInputProvider();
    }

    private void InitInputProvider()
    {
        CompoundInputProvider compoundInputProvider = new CompoundInputProvider();
        if (this.mobileInputProvider != null)
        {
            this.mobileInputProvider.Init();
            compoundInputProvider.AddInputProvider(this.mobileInputProvider);
        }

#if UNITY_EDITOR
        compoundInputProvider.AddInputProvider(new KeyboardAndMouseInputProvider());
#endif

        PlayerInput.InputProvider = compoundInputProvider;
    }
}

Now we are ready to use our PlayerInput class instead of the Input class that Unity gives us.